Showing posts with label christmas. Show all posts

Friday, October 28, 2011

Bah Humbug Die Cuts

Hello Friends -

This is my last week as a guest designer at Bah! Humbug! Challenges.  I am very sad to leave the lovely ladies of the manor but I hope you will join in some of their challenges.  It is a wonderful way to get ready for the holidays without trying to get all of your cards done at the last minute.


Today's challenge is die cuts.  I must admit, this one was tough because the possibilities seemed endless.  I could cut with my cuttlebug.  I could cut with my electronic cutter.  What to do? What to do?

So, I decided to do one of each (I was shooting for two but it just didn't happen).  The first one is an ornament shape card.  I made it using a Lettering Delights simple shape and Sure Cuts a Lot.  I'm disappointed in the way the photo came out.  In person it is all sparkly and fun.


Then I made this simple shaped card using my cuttlebug and a round Spellbinders die.  I think I learned this technique on BBTB2.  To make the base you fold your cardstock in half and then place it in the die just a little bit off.  This way it doesn't cut through the top of the card.  Then I used the next smaller die to cut out the cute Tiddly Inks image.  I can't find him in the Tiddly Inks store right now but I'm certain he is there somewhere.


Finally, I made this side step card.  I used the tutorial at Split Coast Stamper.  I must say, whenever I'm looking for a tutorial on how to make a card, I find they are likely to have it and all of their tutorials have been easy to follow.   I used my electronic cutter to make this card.  All of the images are from Cricut carts, Child's Year, Celebrations and Joy of the Seasons.

I hope you like the die cut cards and a huge thank you to the ladies of the manor.  

Friday, October 14, 2011

Christmas Cooking with Bah Humbug

Hello Friends -

I'm back with my Guest Designer projects at Humbug Hall.  I must say, the ladies of the manor have certainly made me feel welcome and loved.  They are the sweetest ladies you could find and so much fun.

So, I wanted to start off with a little treat especially for Max and Ann.  I made some Hot Buttered Rum and Mint Cocoa.

Don't you just love them?   Do you want to know what I did?  If so, grab yourself a drink, pull up a chair because this might be a long post.  I have a LOT of pictures for you today and I'm not even done.  I think you might be seeing pictures of my second project for the rest of the week.

I started this project with two small milk type bottles from Starbucks.  I bought the bottles of Frappacino at the grocery store and convinced one of my brothers to drink all of them.  I only wanted the bottles.


I filled one bottle with cocoa, marshmellows and a combination of mint chocolate chips and dark chocolate chips.  I put a cut little circle on the top wishing the recipients a Merry Christmas and then moved on to the Hot Buttered Rum mix.

I'm sorry to say there is no rum in the mix but once you add the rum and heat this up you are guaranteed to have a better evening.

Using my Sure-Cuts-A-Lot (SCAL) I printed out the tags and then cut them with my electronic die cutter.  This paper is from Little Yellow Bicycle.  It was two sided so it worked well with the box handle and on the outside of the box.  I also used it for the tag.

I knew what style of carrier I wanted but I was far too rushed to figure out how to make it on my own.  I used a file I bought from a favorite site of mine, The Cutting Cafe.  I resized it a little bit and put this one on a 12 x 24 piece of cardstock.  It ended up being about 1/2 an inch larger than I needed.

Here is the inside of the box.
The pattern paper on the bottom of the carrier is from the same piece as the handles.  This box came together like a dream.
Here is one final shot of the carrier.  I must say I love this paper.  It seems to fit well with the carrier.

And now for my Cookbook...

In my house Christmas isn't about a specific meal.  In fact, we don't focus too much on Christmas dinner.  Christmas Eve is about the rest of the family going to church and me staying home to get the presents wrapped that the Da bought on Christmas Eve day.  We have traditions around the breakfast meal and Christmas night we pull out a game of Trivial Pursuit and play while we eat cheese and crackers and shrimp and veggies (or whatever else we've picked up for the evening).

However, that doesn't mean cooking isn't an important part of our tradition.  In fact, I'm already starting to plan my baking and candy making.  I will turn 50 or more pounds of sugar into cookies and candies.   They are then carefully packaged in 30 or more Christmas tins and shipped all over the country.  This process is time consuming and a little daunting.

The Brits have decided to deport my youngest brother so by early November I should have a helping hand with this crazy process because of family weddings, travel and other unexpected issues, I'm hoping to finish all of the candy making and packaging by December 9th.  I'll let you know how that goes.

OK, back to the project.

I have wanted to make a cookbook of the recipes I use every Christmas.  In fact, I planned to do it last year when I made this cook book for my brother's Christmas present.  But you know how things go.  I ended up making the things I needed and this fell by the wayside.  Then, the Ladies of Humbug Hall said they wanted something with the cooking theme.  Well, now I had an excuse to make my cookbook.


I ended up with 20 recipes that I use every year.  After some thought, I decided I would put them on tags a la Tim Holtz.  They still need some spritzing up (both figuratively and actually) but here they are in all their glory.

Then I pulled out some regular old #10 envelopes, sealed them and cut off the end.


They looked like this with the ends cut off.

If you have a choice, I recommend ones that don't have a printed inside but it wasn't so bad that I decided to buy a new box.  You can see that this one is already covered with a pretty pattern paper.


I pulled out my Bind-It-All and punched holes in the envelopes, on the end that was not cut, and the back of the cover.  You can see the binding on the left side and some of the tags sticking out of the cover on the right.  The section that says "Treats" is actually a flap with a magnet to hold it to the front. This configuration allows me to stand it up.

This is the cover before I added the flap and the decorations.

This is the inside of the cookbook with all of the envelopes bound in and the tags sticking out of the envelopes.  I know, still a little plain but it is getting better.


This is a picture of the cookbook from the opposite side of the one above.  I put a pocket on the inside because I know I'll have more recipes over time.


Finally, this is the bottom of the cover.  If you look closely, I attached this with jump rings to the front and back.  This allows me to swing it all the way around.

So, what do you think of my little project?

I have a ton of work to finish for the Wonderkids Fall Festival.  In fact, I can't wait for it to be done because I want to get back to some peace.  I'll show you the masks we are making and the banner I'll have at our booth.  I may even show you some cakes and other treats.

But, I'll definitely be back with more of the cookbook. Is there anything special you would like to see/hear about?

Have a good day, see you soon.

Monday, January 24, 2011

Christmas Crackers

Last week I about pulled my hair out over the challenge at Bah Humbug Blog but this week I'm set.  Last week was stencils (I could show you how to see what I made but honestly, I'd like to forget that creation).

Go get your coffee or a little something to hold you over.  I've got a story and something to show you.

The challenge was to make something to do with Christmas Crackers.  Here is the post so you can see what the design team made and the exact challenge. I recommend playing along if you get a chance. 

I decided to make Christmas Crackers.  I had been thinking about making these since Christmas Night but I hadn't gotten around to actually putting it all together.  My family normally has Christmas Crackers on the table when we have our traditional Trivial Pursuit game and a light meal.  We normally have this lovely meal of salmon, shrimp, cheese and crackers and some veggies and dip. We break open the Trivial Pursuit game and after a couple of glasses of wine we open our Crackers.  This last year we didn't have enough crackers for everyone.

I should be clear, we live in Atlanta, Georgia, USA and Christmas Crackers are not a normal part of the holiday.  We can sometimes buy them but they are terribly overpriced and not very good.  While I have a brother that flies home from London to Atlanta for Christmas, whatever extra space he has in his bags is reserved for Wine Gums (people claim you can buy these in the states but they aren't the same).
This is a box of wine gums.

So, I started thinking on Christmas night about making crackers for next Christmas.  The Wonderkid thought crackers were fantastic and couldn't understand why we didn't have them every night.  Half of this year's were musical instruments and the other half were random.  We wore the lovely tissue paper crowns for the remainder of the night and periodically I still find the whistles from the musical crackers in random places (hidden by the Wonderkid).

Enough about my excitement for this challenge.  Here is what I did.

I bought some paper at the post-holiday sales at Michaels.  This is the paper.


Then I went and searched SVGCuts.com because I thought they had a cut so I could make these in my E.  They did, it was even a freebie (have I mentioned how much I love SVGCuts?)  They keep all of their freebies on their blog.  Here is the cracker freebie.

So, I resized the cracker to the largest that would fit on an 8.5 x 11 piece of paper.  It ended up being 6.5 inches wide and 10.75 inches high.  I cut 6 of them out of three different pattern papers.

These are the three different patterns.

Then I added a tag.  The scallop is from Mini Monograms.  The sentiment is from The Cutting Cafe (a great place to find digi stamps, especially sentiments in a circle). 
Then, I added a brad to the scallop to attach it to the cracker.  I added 1/4 inch grosgrain ribbon to tie the crackers shut. 


This is what it looks like.  I haven't added the candy but I have a tissue paper hat inside already.  I'll open one end up and add the candy in December.  I read online you can purchase the mechanism that make them "crack".  I'm off to purchase some for this year.

I hope you like my creation.  If you know where to get the internal pieces, I'd love to hear.  Thank you for looking and have a wonderful day.

Wednesday, January 19, 2011

Kraft Christmas Card Using a Stencil

This week's challenge at Bah Humbug was to use a stencil on a Christmas project.  Now, I love the idea of stencils (and masks).  In fact, I've bought 3 or 4 of Tim Holtz's masks but I've never used a single one.  Each and every one is still in its packaging waiting for me to use them.  Shh, don't tell anyone, I like to pretend that ALL of my craft supplies were NECESSARY. 

When I looked at the stencils I own, none of them really said "Christmas" to me.  So, they are still in their packaging.  However, I REALLY wanted to play along with the Bah Humbug Challenge. 

So, I thought about it and decided that I couldn't justify buying more stencils or masks.  I decided the best idea was to make my own stencil.  I pulled out a piece of acetate (mine came from a package of overhead projector pages) and placed it in my Cricut.  I cut out three snow flakes of varying size and style from the Winter Lace cart.  On a side note, I kept trying to tell myself I didn't really need this cart but when it went to $12 recently I just couldn't pass it up and I'm so glad I have it.  I've used it at least a half dozen times in just a couple of weeks.

Here are the snowflakes after I used them as a stencil.
I have cleaned them off since and I plan to put them next to the stencils I've purchased.  I used my Tombow Repositionable tape to adhere the stencils to the card.  Then I spread white A La Mode pigment ink over the stencils.  On the card above, I used Versamark and A La Mode Sparkle Embossing Powder before I started the inking.  The card below I applied the pigment ink with the stencils and then the embossing powder. 


I think I like the first card better.  What do you think?

Monday, January 10, 2011

Christmas Card Embossed with a Holly Leaf

I have watched all of the wonderful cards created for some of the challenge blog sites and have been wanting to submit some items.  In fact, the reason I initially created this blog was so I would have a place to post my cards for the different challenges.  That was 6 months ago and while I've created a number of things, I haven't done a challenge since last July/August.  I'm hoping that will change. 

Without further ado, here is my Christmas card for today.

I wanted to try a new technique.  I embossed a piece of white cardstock using the Tim Holtz Sizzix embossing folder, Merry Christmas.  The embossed cardstock is 4 inches by 5.25 inches.  I covered my brayer with green ink, then rolled it over the embossing folder.  I must tell you, I was a bit nervous as I did this to one of my brand new embossing folders but it came off with just a baby wipe.  My embossing folder looks just fine.  I would have liked to have the ink a little darker and I'm not certain why the center section never quite inked the paper but I still like the effect.  Then, I added a bit of holly (I used the cricut cut from Joy of the Season) and I put all of it on a card topper of red with gold glitter florishes.  The card base is white card stock.  The red paper comes from Little Yellow Bicycle. 

Here is a close-up of the holly and the embossing.

I hope you like this and that it will inspire you to try something new, whether that is doing a challenge or a new technique.

Thank you for visiting my blog.  If you like what you see, please consider becoming a follower.

Monday, December 27, 2010

Christmas Cards

 I didn't get a chance to make many Christmas cards this year.  I ended up working on a number of large project instead.  Then, there were lots and lots of baked goodies.  Anyway, it just didn't happen this year.  I'm thinking about doing a ton of them early in the new year so I'm ready for next year. 

This card was made fairly quickly but I love it.  I used some acetate (I have a ton of it from all of the packaging around my house and I never seem to work it out to use it.) to attach the snowy house to the card.  This next picture shows the card straight through.  I used rock candy stickles on the snow covered roof and the ground.  The oval frame was a freebie from SVGCuts.  Isn't it lovely.


I placed the acetate between the top of the card and the next layer.

When I designed this card in my head, I embossed the card topper and then put the oval frame around it.  However, when I put the frame around the oval with the embossing, it was just too much.

So, I made two cards.  Each is very different but uses the same basic cuts.
I love this Tim Holtz embossing folder.  I ran the card topper through twice, once for each end of the card.  The card topper is 1/2 inch smaller than the card base.  Again, I cut an oval in the base and the card topper and put a piece of acetate between the two in order to afix the snowy house onto the card.

Here is the card opened up so you can see through the card.
I tried to get a closer view of the embossing but I couldn't get a crisp clear picture of it. 

I hope you enjoyed my Christmas cards and had yourself a wonderful holiday. I'm trying to finish one big project which I hope to be able to share in the next day or so.  Stay warm and safe and happy crafting.

Thursday, December 23, 2010

Calendar - Part 2

This is part 2 of my Calendar project.  If you missed the first post, I suggest going back.  It discusses all of the great features of Designer's Calendar.  You can find the post here.

Now, my regular readers know how much I love my carts.  I have lots of them and find them to make things easier for me.  However, I also love my SCAL.  It gives me additional options.  Today I'm going to show a couple of pages I made using SCAL.  I bought some items from SVGCuts and Lettering Delights.  For those people that missed it, Lettering Delights is now selling SVG files ready to cut.  I've been using their clip art and doodlebats and preparing them for cutting myself.
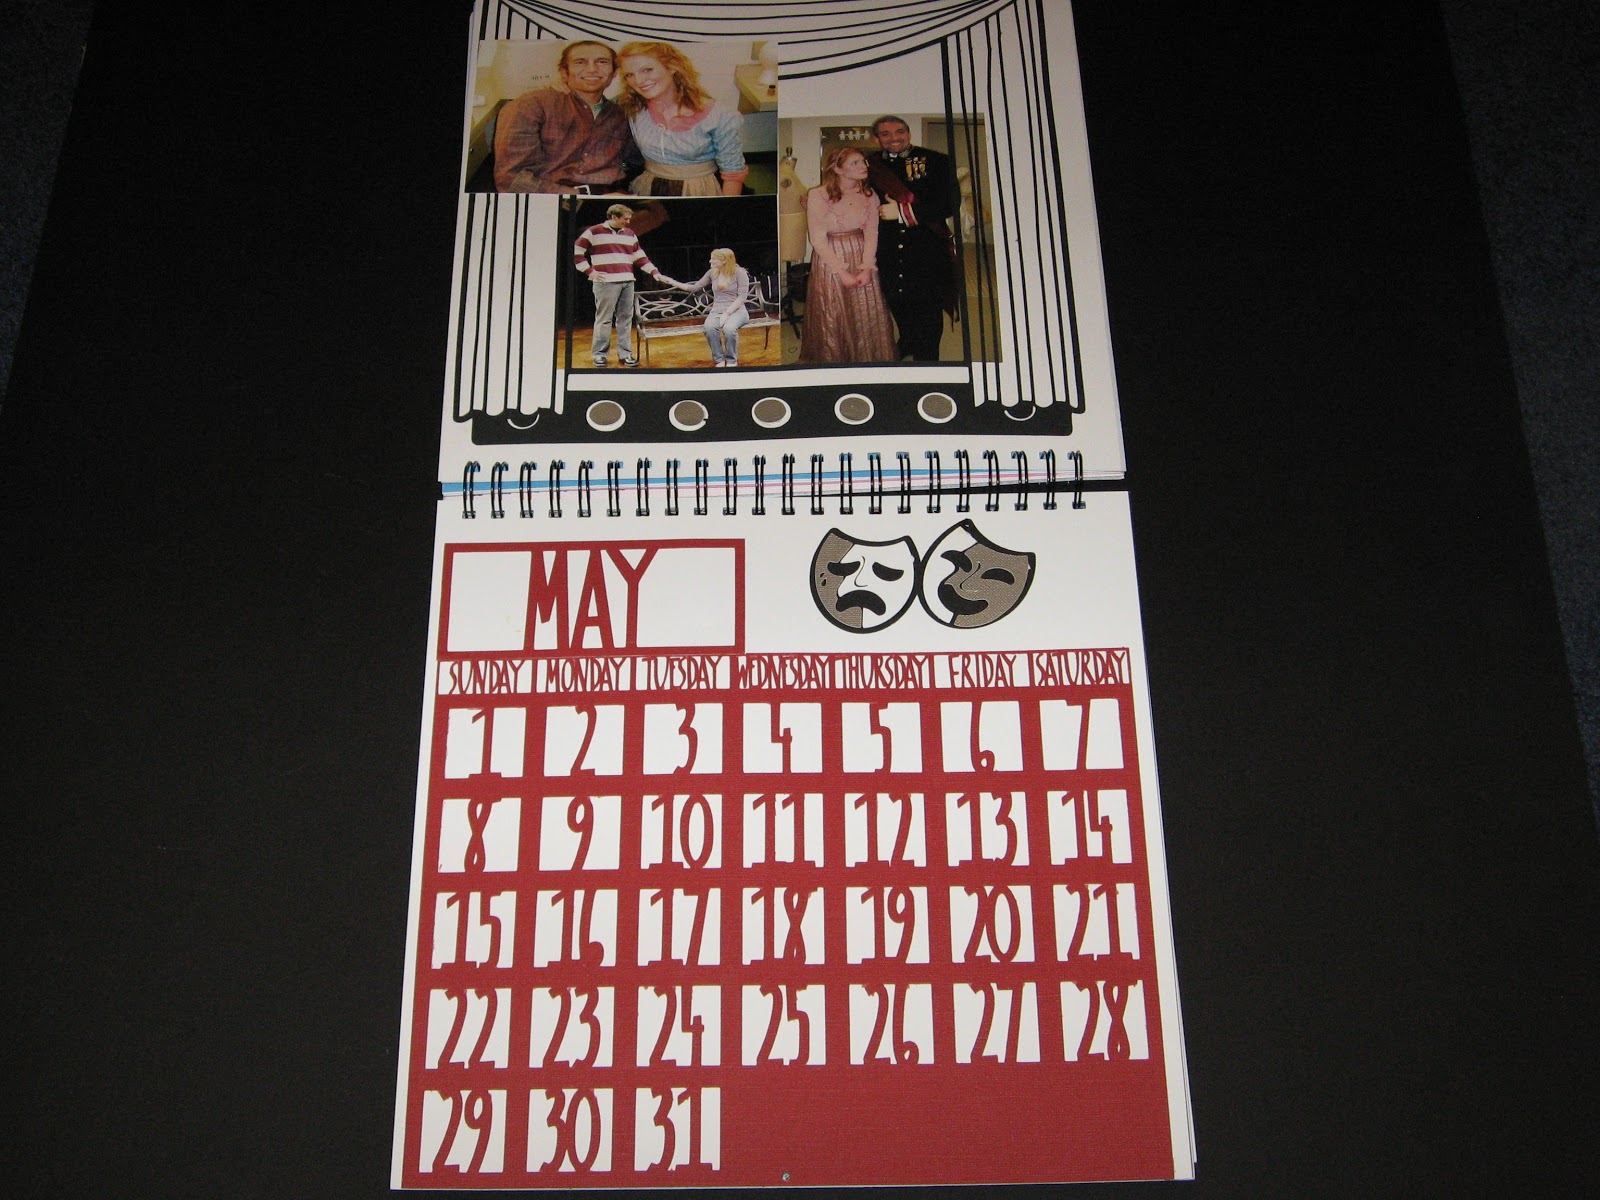
 This page was made from a set called Lights, Camera, Action.  I bought the set over the summer but haven't had a chance to cut it until this week.  I did very little to change it in order to cut.  I took out about half of the lines on the stage and I moved the parts of the mask (already divided) so that I could cut them in different colors.
 Here is a better picture of the stage.  I also cut the lights separately in silver to give it a little bit of texture.  It is very delicate but I thought it made a great frame (even if I had more pictures than it would hold).

Don't you love the masks?  I think they came out fantastic.  This is an example of why I love having SCAL.  It allows me to cut things that Provo Craft isn't likely to ever create.  They have some fantastic things but I love the flexibility of creating things in my imagination.


 I made this page using SVGCuts' Serene Leaves and 3D Fall Cards.  My picture doesn't properly show the the frame on the bottom card.  It has oak leaves going up the side of the card.  The ribbon comes from Ribbon and Bows Oh My.  I purchased one of their Convenience Packs after Okie Ladybug was raving about how great they are.  I must admit, I think she is correct.
This picture didn't come out very good.  It looks like it has the measels but those are actually little leaves.  I love this paper (DCWV Amber Autumn Stack) but it is almost impossible to cut it using my Cricut.  Some of the leaves are glittered, some are embossed and some are a flat imprint.  It makes it gorgeous but it causes so much grief for the cutter.  I ended up cutting this 4 times (twice with a brand new blade) and it still wouldn't cut cleanly.  However, I LOVED all of the matching cardstock.  I think all four or five colors were in the pack.  And even with all of those options I ended up using some of the patterned papers that coordinated for the orange leaves.

Both of these frames came from SVGCuts.  I believe at least one was free (maybe both).  If you are on their email list they email you a link for a free cut file at least once a week and maybe twice.  Many of them are one cut from some of the files they sell.

 The frame on this one is from SVGCuts also.  The paper is from Paper Studio's A Country Christmas.  It has the cardstock and pattern paper in the same stack.  I decided to use some different techniques on this page.  I used Rock Candy Crackle Paint on the snowmen and Glossy Accents on some of the snow flakes to give them a bit of shimmer.  The snowflake brads are also from Paper Studio. 


I used some snowflake stamps to give the white paper a little more interest.  I initially cut the calendar as a test cut but then I decided to use it since it worked. 

I hope you have enjoyed this project.  I was able to finish it in less than a week (I didn't have much of a choice, we were exchanging gifts a couple of days ago) but a few of the pages are lacking because of the speed.  If anyone can help me with a way to share the cut files, I would be happy to load them up and offer them to anyone wanting to make a 2011 calendar.

Enjoy, I'm hoping to be able to post a couple of additional projects before Christmas.

Tuesday, December 21, 2010

Calendar


I have given away my first large present of the year.  I made a calendar using Designer's Calendar.  In the past I have used one of those programs to make calendars for my family and friends.  You know the ones, it seems everyone in the world offers them. I made mine with Costco but Snapfish and RitzPix and everyone else out there offers them.  My frustration with those calendars is they force you into one of their boxes.  You get a template (maybe a couple) and you must fit your pictures into that template.  Often times I don't want the entire pictures (I never said I was a great photographer, many of my pictures seem to be off center).  Or, I will want a vertical picture with two horizontal pictures and that isn't an option with them.

When I first saw Designer's Calendar I knew I wanted it.  I love the idea of making calendars, they are practical and allow me to display photos.

This cart has some neat features.  It has four fonts (base, script, boxed, circled) and it has a ton of word art (although it seems to be a little American centric -- Columbus Day is one of the pieces of word art).  Because I knew I was going to be cutting out 12 months worth of calendars, I didn't want to mess with each and every day needing to be laid out separate.  Therefore, I used the boxed numbers, months and days and welded them all together.  By doing this, I was able to make a "lace" out of the calendar which I then glued to another piece of cardstock.

Here is the way it looked in Design Studio.  The months are all the same length, I used the same days and copied them to the next month, then I only needed to make certain I started the month on the correct day (and remember which ones have 30 or 31 days).

As you can see, I have hidden the outside of the box going around each number.  The box is blue, not black like the number.  My only frustration with this project came when I wanted to save the calendar.  Because I only hid one contour (the outside of the box) I couldn't save it.  Each time I want to cut one of these, I need to go back and hide the appropriate contours. I tried hiding two contours and copying each number over top of itself so I could hide two contours on each (thus making it possible to save the hidden parts).  On the first two pages where I tried this, it randomly cut different contours.  It was frustrating enough (and I had so little time) that I quit with the idea that I'll go back and figure it out later. 

The base cardstock is Core'dinations, the pattern paper is from a company called Gartner in Minnesota.

The pattern paper is from DCWV's Animal Crackers and the base brown is from Cloud 9. 

Here are three of the months.  I loved the way they looked using patterned paper and a solid paper.  I used paper from more companies than I can name.  The holly paper for December was from Paper Studio which comes with the coordinating cardstock.  Paper Studio is sold by Hobby Lobby.  I bought this stack in July of this year. 

So far, all of the pictures look a bit plain.  It wasn't all that way.  Here are some of the other pages.

I used Core'dinations White Wash cardstock for the shamrocks.  I then put them through my cuttlebug using the Divine Swirls and Dots folders.  I didn't want too much on the page because of all the pictures but I needed something.

 I love this page.  I'm not normally a fan of the pink but I think this came out nice.  I created the strip of hearts in Design Studio using the Love Struck cart.  The large valentine heart is from the same place.  If you are a fan of Design Studio (as I am) I will warn you that the keyword search never finds any of the hearts on this cart.  I don't know why but I have taken to using CricutSearch.com because of this problem, especially.
I used a  K & Company stack for the patterned paper and Core'dinations for the embossed hearts.  I also used buttons from JoAnn's to decorate the empty spot at the top.  I used a technique from Enfys at Going Buggy.  If you haven't had a chance to check out her blog, I highly recommend it. She does some incredible inking and great cards, layouts etc.

 Isn't this a fun page?  I used Walk In My Garden for the flowers and then the other embellishments are from the very wonderful Creative Charms.  I absolutely love their products.  The butterflies, ribbon and jewels are all from Creative Charms.  You can find them here.  I have some of their velvet poppies which are very elegant but I have so much trouble convincing myself to use them.

 Here is a close-up of one of the butterflies, some of my stitching and the ribbon.  I also inked the edge of the flower using my bic markers.  I loved the effect it made by soaking into the paper in different ways.

The cardstock is Core'dinations White Wash and the pattern paper is the Basics from the Paper Studio.  I am normally a huge fan of the Paper Studio but this stack was one of my worst purchases.  None of the colors coordinate with ANYTHING.  They are all just a little bit off.  However, in this situation, I was able to use some of the blue.

 The yellow cardstock is Core'dinations.
I know this page is a bit plain but I'm loving it none the less.  Isn't the owl cute and he matches so nicely.  The pattern paper is from KI Memories' Little Guy stack.  I bought it at JoAnns.  It just goes to show, you can find what you are looking for in some very odd places.  The recipient of the calendar was in a sorority and their mascot was an owl so I added this little guy to this page.

 It is a little plain but fun none the less.  You can't tell from this photo but I embossed the frames using my cuttlebug and the damask folder. The sun and bee came from Create A Critter. 
It is tough to see but the wings on the bee are made using the packaging from one of my carts.  I embossed it using dots.  I think I should have inked it also but I was starting to run out of time and energy.

Tomorrow, I'll show you more pages of this project.  I have some really neat stuff to add but this is getting a bit long.