Tuesday, December 28, 2010

Buttermilk Biscuits

I love to make buttermilk biscuits, especially whenever my brother comes home from London.  As all of my friends outside of the States know, biscuits mean something completely different elsewhere.  Here, they are a bread often eaten for breakfast but also with other meals if you are in the South.  The ones above are layered biscuits which can be pulled apart for lots of layers with tons of butter and...
fruit butter.  This is a jar I cracked open this morning, Peach Vanilla Butter.  I used a modified version of this recipe from Food in Jars.  The Wonderkid prefers to eat Applebutter on his biscuits so we had two jars open this morning.

It was a yummy meal on a cold day.  I think everyone was quite pleased.  This recipe made it into the "big project" I'm working on.  I'll share it also.  This is a modified recipe from Martha Stewart Magazine.


Buttermilk Biscuits

4 cups King Arthur flour, plus more for dusting
4 teaspoons baking powder
1 teaspoon baking soda
1 ½ teaspoons salt
1 teaspoon sugar
1 cup (2 sticks) unsalted butter cut into pieces
2 cups buttermilk (I use lowfat, no one will ever know the difference)
2 teaspoons cayenne pepper (optional)
3 cups grated cheddar cheese (optional)

  1. Preheat oven to 500F.  In a medium bowl, whisk flour, baking powder, baking soda, salt, sugar and cayenne pepper.  Add butter; using a pastry blender or two knives, cut mixture in until mixture resembles coarse crumbs.
  2. Add the buttermilk; stir just until mixture comes together; batter will be sticky.  Transfer to lightly floured work surface; use floured fingers to pat dough to 1 inch thickness.  Use a 2 inch round biscuit cutter or cookie cutter to cut biscuits as close together as possible to minimize scraps.
  3. Transfer to baking sheet; bake at 500 degrees for just 4 minutes then turn down over to bake at 375Ffor 20 – 25 minutes.  Remove from oven; cool on a wire rack.  Serve warm.

OK – here are some modifications.  You can leave out the cheddar cheese and/or the cayenne pepper.  These are good biscuits any way you do them.  I normally make them as layered biscuits.  If you do that you would change it this way:

Once you have the batter and it is sticky,
  1. On a lightly floured surface, gently roll dough into an 8 x 11 rectangle.
  2. Fold the top and bottom thirds inward, overlapping at the center of the dough.
  3. Turn the dough a quarter turn; then repeat steps 1 and 2.
  4. Wrap dough in plastic wrap and chill for 30 minutes.
  5. Remove plastic wrap and roll out to ½ inch thickness.  Then cut with same biscuit cutter as step 2 above.  Continue with steps.

Notes about biscuits
  1. Don’t overwork the dough.  If you do that it will be tough.
  2. Chilling the dough creates the pockets that makes the biscuits flaky.
  3. You can use powdered buttermilk instead of fresh if you want.  It is much better with buttermilk than with regular milk.
  4. Use a sharp utensil to cut them and don’t twist it, they won’t rise well if you twist the cutting utensil.    

Monday, December 27, 2010

Christmas Cards

 I didn't get a chance to make many Christmas cards this year.  I ended up working on a number of large project instead.  Then, there were lots and lots of baked goodies.  Anyway, it just didn't happen this year.  I'm thinking about doing a ton of them early in the new year so I'm ready for next year. 

This card was made fairly quickly but I love it.  I used some acetate (I have a ton of it from all of the packaging around my house and I never seem to work it out to use it.) to attach the snowy house to the card.  This next picture shows the card straight through.  I used rock candy stickles on the snow covered roof and the ground.  The oval frame was a freebie from SVGCuts.  Isn't it lovely.


I placed the acetate between the top of the card and the next layer.

When I designed this card in my head, I embossed the card topper and then put the oval frame around it.  However, when I put the frame around the oval with the embossing, it was just too much.

So, I made two cards.  Each is very different but uses the same basic cuts.
I love this Tim Holtz embossing folder.  I ran the card topper through twice, once for each end of the card.  The card topper is 1/2 inch smaller than the card base.  Again, I cut an oval in the base and the card topper and put a piece of acetate between the two in order to afix the snowy house onto the card.

Here is the card opened up so you can see through the card.
I tried to get a closer view of the embossing but I couldn't get a crisp clear picture of it. 

I hope you enjoyed my Christmas cards and had yourself a wonderful holiday. I'm trying to finish one big project which I hope to be able to share in the next day or so.  Stay warm and safe and happy crafting.

Thursday, December 23, 2010

Calendar - Part 2

This is part 2 of my Calendar project.  If you missed the first post, I suggest going back.  It discusses all of the great features of Designer's Calendar.  You can find the post here.

Now, my regular readers know how much I love my carts.  I have lots of them and find them to make things easier for me.  However, I also love my SCAL.  It gives me additional options.  Today I'm going to show a couple of pages I made using SCAL.  I bought some items from SVGCuts and Lettering Delights.  For those people that missed it, Lettering Delights is now selling SVG files ready to cut.  I've been using their clip art and doodlebats and preparing them for cutting myself.
 This page was made from a set called Lights, Camera, Action.  I bought the set over the summer but haven't had a chance to cut it until this week.  I did very little to change it in order to cut.  I took out about half of the lines on the stage and I moved the parts of the mask (already divided) so that I could cut them in different colors.
 Here is a better picture of the stage.  I also cut the lights separately in silver to give it a little bit of texture.  It is very delicate but I thought it made a great frame (even if I had more pictures than it would hold).

Don't you love the masks?  I think they came out fantastic.  This is an example of why I love having SCAL.  It allows me to cut things that Provo Craft isn't likely to ever create.  They have some fantastic things but I love the flexibility of creating things in my imagination.


 I made this page using SVGCuts' Serene Leaves and 3D Fall Cards.  My picture doesn't properly show the the frame on the bottom card.  It has oak leaves going up the side of the card.  The ribbon comes from Ribbon and Bows Oh My.  I purchased one of their Convenience Packs after Okie Ladybug was raving about how great they are.  I must admit, I think she is correct.
This picture didn't come out very good.  It looks like it has the measels but those are actually little leaves.  I love this paper (DCWV Amber Autumn Stack) but it is almost impossible to cut it using my Cricut.  Some of the leaves are glittered, some are embossed and some are a flat imprint.  It makes it gorgeous but it causes so much grief for the cutter.  I ended up cutting this 4 times (twice with a brand new blade) and it still wouldn't cut cleanly.  However, I LOVED all of the matching cardstock.  I think all four or five colors were in the pack.  And even with all of those options I ended up using some of the patterned papers that coordinated for the orange leaves.

Both of these frames came from SVGCuts.  I believe at least one was free (maybe both).  If you are on their email list they email you a link for a free cut file at least once a week and maybe twice.  Many of them are one cut from some of the files they sell.

 The frame on this one is from SVGCuts also.  The paper is from Paper Studio's A Country Christmas.  It has the cardstock and pattern paper in the same stack.  I decided to use some different techniques on this page.  I used Rock Candy Crackle Paint on the snowmen and Glossy Accents on some of the snow flakes to give them a bit of shimmer.  The snowflake brads are also from Paper Studio. 


I used some snowflake stamps to give the white paper a little more interest.  I initially cut the calendar as a test cut but then I decided to use it since it worked. 

I hope you have enjoyed this project.  I was able to finish it in less than a week (I didn't have much of a choice, we were exchanging gifts a couple of days ago) but a few of the pages are lacking because of the speed.  If anyone can help me with a way to share the cut files, I would be happy to load them up and offer them to anyone wanting to make a 2011 calendar.

Enjoy, I'm hoping to be able to post a couple of additional projects before Christmas.

Tuesday, December 21, 2010

Calendar


I have given away my first large present of the year.  I made a calendar using Designer's Calendar.  In the past I have used one of those programs to make calendars for my family and friends.  You know the ones, it seems everyone in the world offers them. I made mine with Costco but Snapfish and RitzPix and everyone else out there offers them.  My frustration with those calendars is they force you into one of their boxes.  You get a template (maybe a couple) and you must fit your pictures into that template.  Often times I don't want the entire pictures (I never said I was a great photographer, many of my pictures seem to be off center).  Or, I will want a vertical picture with two horizontal pictures and that isn't an option with them.

When I first saw Designer's Calendar I knew I wanted it.  I love the idea of making calendars, they are practical and allow me to display photos.

This cart has some neat features.  It has four fonts (base, script, boxed, circled) and it has a ton of word art (although it seems to be a little American centric -- Columbus Day is one of the pieces of word art).  Because I knew I was going to be cutting out 12 months worth of calendars, I didn't want to mess with each and every day needing to be laid out separate.  Therefore, I used the boxed numbers, months and days and welded them all together.  By doing this, I was able to make a "lace" out of the calendar which I then glued to another piece of cardstock.

Here is the way it looked in Design Studio.  The months are all the same length, I used the same days and copied them to the next month, then I only needed to make certain I started the month on the correct day (and remember which ones have 30 or 31 days).

As you can see, I have hidden the outside of the box going around each number.  The box is blue, not black like the number.  My only frustration with this project came when I wanted to save the calendar.  Because I only hid one contour (the outside of the box) I couldn't save it.  Each time I want to cut one of these, I need to go back and hide the appropriate contours. I tried hiding two contours and copying each number over top of itself so I could hide two contours on each (thus making it possible to save the hidden parts).  On the first two pages where I tried this, it randomly cut different contours.  It was frustrating enough (and I had so little time) that I quit with the idea that I'll go back and figure it out later. 

The base cardstock is Core'dinations, the pattern paper is from a company called Gartner in Minnesota.

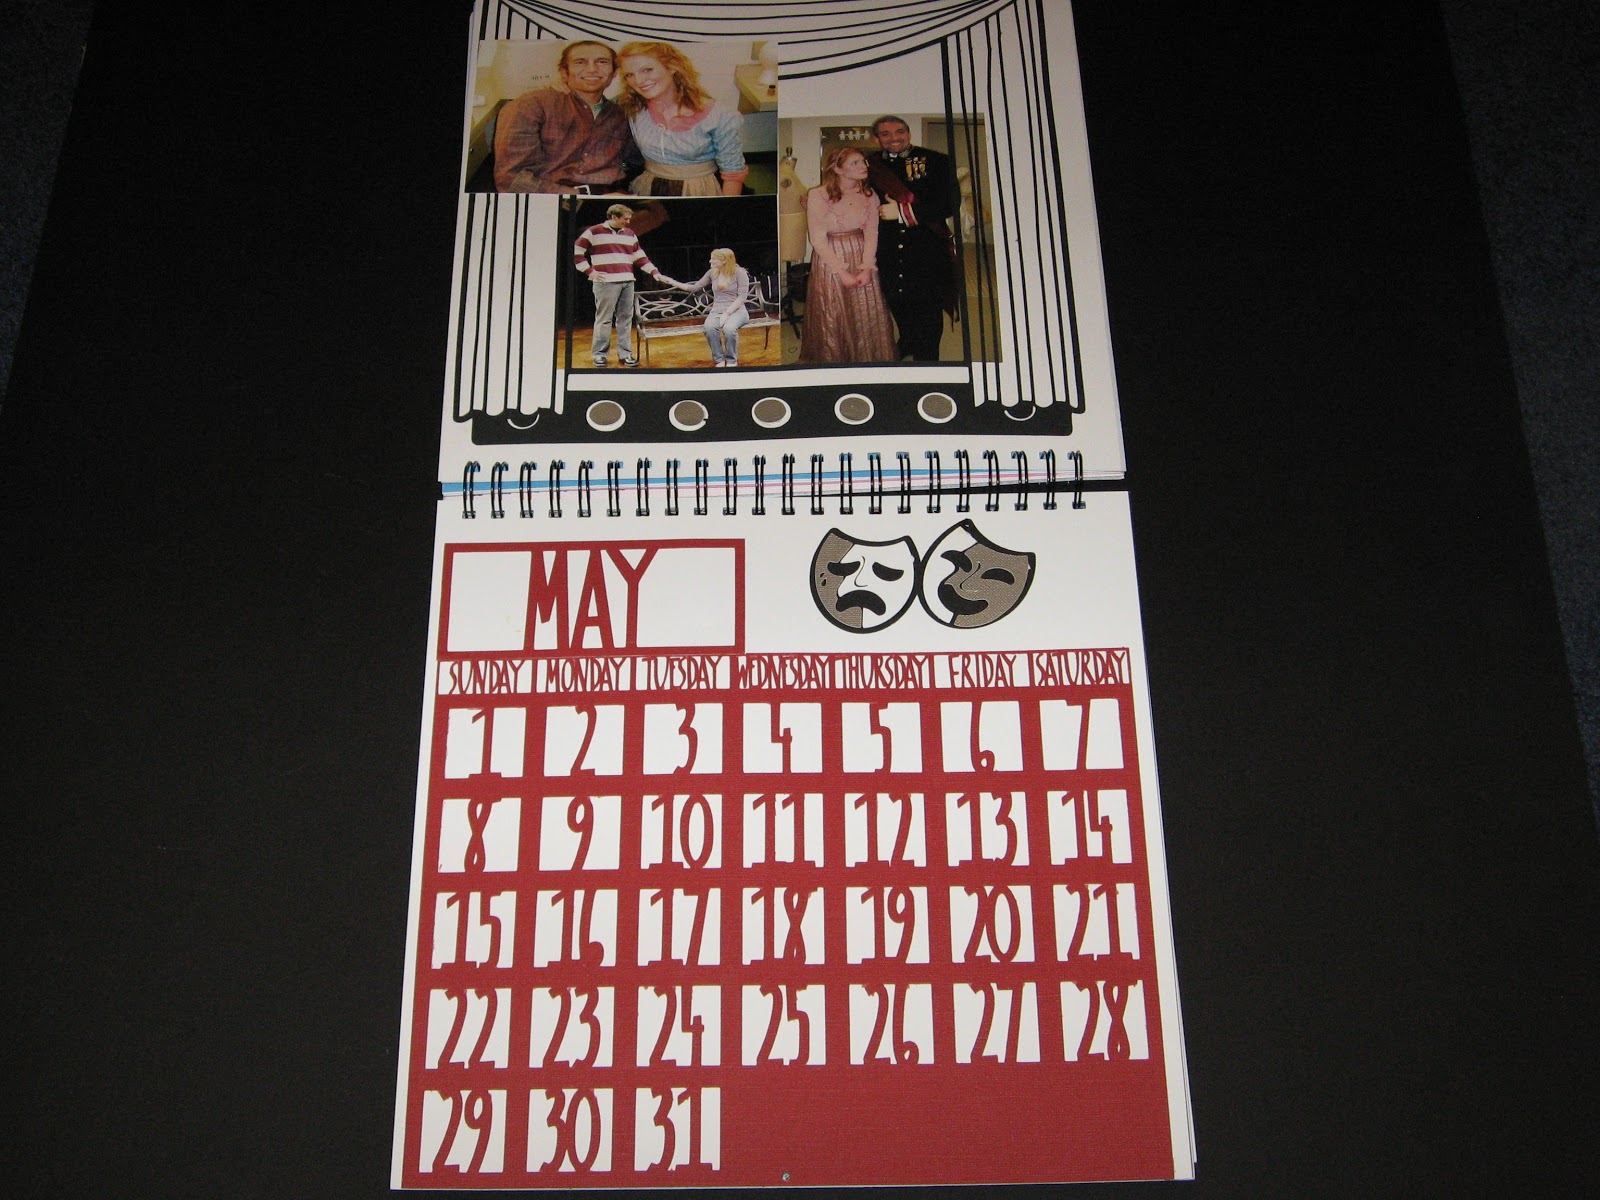
The pattern paper is from DCWV's Animal Crackers and the base brown is from Cloud 9. 

Here are three of the months.  I loved the way they looked using patterned paper and a solid paper.  I used paper from more companies than I can name.  The holly paper for December was from Paper Studio which comes with the coordinating cardstock.  Paper Studio is sold by Hobby Lobby.  I bought this stack in July of this year. 

So far, all of the pictures look a bit plain.  It wasn't all that way.  Here are some of the other pages.

I used Core'dinations White Wash cardstock for the shamrocks.  I then put them through my cuttlebug using the Divine Swirls and Dots folders.  I didn't want too much on the page because of all the pictures but I needed something.

 I love this page.  I'm not normally a fan of the pink but I think this came out nice.  I created the strip of hearts in Design Studio using the Love Struck cart.  The large valentine heart is from the same place.  If you are a fan of Design Studio (as I am) I will warn you that the keyword search never finds any of the hearts on this cart.  I don't know why but I have taken to using CricutSearch.com because of this problem, especially.
I used a  K & Company stack for the patterned paper and Core'dinations for the embossed hearts.  I also used buttons from JoAnn's to decorate the empty spot at the top.  I used a technique from Enfys at Going Buggy.  If you haven't had a chance to check out her blog, I highly recommend it. She does some incredible inking and great cards, layouts etc.

 Isn't this a fun page?  I used Walk In My Garden for the flowers and then the other embellishments are from the very wonderful Creative Charms.  I absolutely love their products.  The butterflies, ribbon and jewels are all from Creative Charms.  You can find them here.  I have some of their velvet poppies which are very elegant but I have so much trouble convincing myself to use them.

 Here is a close-up of one of the butterflies, some of my stitching and the ribbon.  I also inked the edge of the flower using my bic markers.  I loved the effect it made by soaking into the paper in different ways.

The cardstock is Core'dinations White Wash and the pattern paper is the Basics from the Paper Studio.  I am normally a huge fan of the Paper Studio but this stack was one of my worst purchases.  None of the colors coordinate with ANYTHING.  They are all just a little bit off.  However, in this situation, I was able to use some of the blue.

 The yellow cardstock is Core'dinations.
I know this page is a bit plain but I'm loving it none the less.  Isn't the owl cute and he matches so nicely.  The pattern paper is from KI Memories' Little Guy stack.  I bought it at JoAnns.  It just goes to show, you can find what you are looking for in some very odd places.  The recipient of the calendar was in a sorority and their mascot was an owl so I added this little guy to this page.

 It is a little plain but fun none the less.  You can't tell from this photo but I embossed the frames using my cuttlebug and the damask folder. The sun and bee came from Create A Critter. 
It is tough to see but the wings on the bee are made using the packaging from one of my carts.  I embossed it using dots.  I think I should have inked it also but I was starting to run out of time and energy.

Tomorrow, I'll show you more pages of this project.  I have some really neat stuff to add but this is getting a bit long.

Wednesday, December 15, 2010

Secret Shop

The Wonderkid's school has a Secret Shop (think Secret Santa without the Santa) for the kids to purchase gifts for their family and friends.  I must say, this is a huge under taking and the woman in charge does an incredible job of buying through out the year.  She has some connections with the retail world and is able to get some fun stuff.  My only thought while looking at everything was, "think of all the stuff I could make for the kids to buy".  I know, it wasn't about me but...

I digress.  This is the first year the Secret Shop was in a new location.  I think it had been in the old location forever, a cute little cottage without a lot of space but very homey.  So, the folks that ran it knew what it looked like in the past and were having trouble picturing what it could look like in the new space.  I saw so many possibilities.  Unfortunately, I didn't have time to order any new vinyl so we went with what I had.  The blue snowflakes matched the table clothes nicely, the red actually looked a little out of place but I don't think folks noticed too much.

I used Winter Wonderland font for the lettering and cut the "S" out as large as I could on a 12 x 24 mat.  I made all the rest of them proportional.  I put the letters up at angles because I knew I wouldn't be able to make them perfectly straight (remember I had no time to order vinyl, I also didn't have a level and I didn't want to write on the walls) so they were obviously/purposely a kilter.  The snow flakes were cut from last year's seasonal cart, "When It's Cold Outside".  When the new seasonal came out I initially thought, I don't need that one.  I have When It's Cold Outside.  Then I started looking at the snowflakes closely and I realized a lot of them have an image hidden in them. I guess I didn't notice last year because I was so new to my cricut and I was cutting them at 2 inches instead of 12.  So, now I'm thinking I "need" to buy myself the new snowflake cart (or make some designs like Diane of Capadia Designs). 

Here is one more picture of the lettering.  I must say, if you are new to vinyl, this is not the font to cut at 24 inches.  The two sides of the letters did NOT want to lay down nicely.  However, I got it on the walls, eventually.

Here is the other side of the room.  As you can see, we were only using a portion of what we call the Community Center.  If you are a regular reader, you will remember when I started using shower curtains with vinyl.  It was when I created a banner for the Fall Festival.  You can see the post here.  Well, shower curtains to the rescue, again.  We wanted something to divide the room and keep the little ones in the correct area. I created a PVC pipe frame using 1 inch PVC pipe, 2 foot by 2 foot pieces of 1/2 inch press board (ply wood to some of you) and either T connectors or elbow connectors.  This really was an easy, inexpensive way to make this project work.

Here are a few of the snowflakes with the ribbons I used to tie them up.  I found ribbon that exactly matched the table clothes we had on each of the tables.  The table clothes were pink, green and blue.

More snowflakes.


When I started adding up what I spent, I used almost 20 sheets of vinyl, 7 shower curtains, 6 rolls of ribbon (bought with 40% off coupons from Michaels) about 10 PVC pipes cut to the appropriate lengths and 1 piece of press board.  The entire project (even with the vinyl) was about $100.  Everything is reusable, except for the lettering on the wall.  That will need to be recut next year. 

I have a ton of things I'm working on but I'm running out of time to get them posted.  I may be flooding folks right after Christmas.  I'll try to do pictures of all the baked goods I've been working on.  My cookie tins need to be mailed on Thursday. 

Monday, December 6, 2010

Crowns and Wands


Over the Thanksgiving holiday I need some easy crafts to do with the Wonderkid and his cousin.  When Lindsay suggested the mirror-like cardstock Target was selling for $1 (and that was for 2 sheets) with her crown file I had some ideas. 

I purchased a wonderful file from Lindsay on MyGrafico.  You can find the file here.  I must admit that I never would have thought to purchase this file for a children's project. The file really is very "Ooh La La".  It is bras and bustiers and all that with this crown in the middle.  I'm glad I saw past the way it was laid out.  I would have been disappointed if I hadn't seen the potential crown for the little ones.

OK, I realize this isn't the cutest thing you have ever seen.  It isn't incredible but the kids LOVED them.  They wore them every day for the entire week.  In fact, I was afraid the Wonderkid would have a fit if we didn't bring his home on the plane. 

One not of caution, the crown is laid out so it could have combs hot glued to the end.  I didn't want to do that with the little ones so I ended up using a piece of paper and taping it to the ends.  If I had been smart, I would have taken the scraps and made a piece for the back so it could go all the way around the head.

Here is a picture of the little ones with their crowns (the older one wasn't as into the craft projects and this gave us something to do in the mornings so she could sleep in).

The crowns were worn front facing and backward.  The crown might not be the best thing in the world but isn't he?


I called this "gangster-style".  This was after wearing the crowns for 4 days.  I'm amazed at how well they held up.

I don't have a picture of the wands but we used two stars for each of them.  They were only about an each across.  I used Scotch Quick Dry adhesive to attach the ribbon and the stars to a pencil.  The little ones added gems to match their crowns.  The best part was the Wonderkid running around yelling "abba cadabba". 

So, if you need a quick, easy project to do with multi-aged little ones I definitely recommend this one.  It was a bigger hit than I ever could have hoped.

Saturday, December 4, 2010

One More Advent Calendar

I purchased this Advent Calendar file from SVGCuts.com.  It can be purchased here.  I need to start this post off with a couple of observations.  I did a LOT of Advent Calendars this year, five in total.  Three of them I designed myself and two of them I "bought".  The first was the Christmas Village Cartridge from Provo Craft.  I normally find that purchasing something from Provo Craft (the maker of all the Cricut "stuff") is the easier way to do things.  The cuts all fit together easily and they tend to be very straight forward. 

Christmas Village was not that way.  You can see my Bethlehem Village here.  There were virtually no "directions" on how to make it fit together.  You had two villages on one cart (the Middle Eastern/Bethlehem Village and the Victorian Village) and you had a bunch of boxes but no real idea about where they fit, what size they should be or how many you needed.  It is a nice cartridge but it isn't intuitive like most of their carts and thus not easy to use.  I think Robotz was similar but at least with that one you had everything you needed on one key and could work it out fairly quickly.  That wasn't the case on Christmas Village.  My other complaint about the cart is all of the figures have been made to stand up.  If you want to put them on a scrapbook page, they will have a slit along the bottom.  If Provo Craft would change the slit just a little, it could be hidden in Design Studio or with the Gypsy and then the uses multiply. Please, don't take this a slam against Provo Craft.  I love my carts and I love using SCAL.  Sometimes one is a better fit for what I want to do, sometimes another. 

As tough as Christmas Village was, SVGCuts Advent Calendar was a breeze. They have a 15 minute tutorial online so you can watch one being put together.  I think that made it more likely I would buy the file but it wasn't actually necessary once you started cutting the pieces out.


The bottom of the calendar is a plain square.  If you don't change any of the dimensions (which you don't need to when importing it into SCAL) it will be 11.5 inches square.  I made mine black.


Here are all of the pieces.  The top 4 are the ones for the outer edge.  The remainder of the pieces are the edges of each box. 

As you can see, each box wall has the number on it so you can put it in the correct place on the calendar face. I had three sheets of 12 x 12 cardstock for the inner boxes alone.  I must say these were very easy to fold, barely needed my bone folder and certainly didn't need my score board. 

Here is a close-up of the bottom left corner.  I love all the details.  The directions describe the doors as 3 shades of green, two shades of red and white for most of the numbers.  After doing this once, I would probably do more of them in solid shades and then emboss some, stamp some and decorate them in other ways. 
Some of the boxes are fairly wide.  It is easy to put a lip gloss in at least 4 of them.  You could also fit things the size of 3 or 4 tea bags (as you can see in #19 here).  I made gift tags to put inside #21 since that should be early enough that they can still be used this year. 

These are some of the doors before I inked the edges and attached them to the appropriate doors.
This is the white glitter cardstock I used for the numbers.  I was able to put one set of numbers on half a piece of 12 x 12 cardstock.

These are the two stacks I used for this project.  The black was Recollections cardstock from Micheals.  All of the other papers were from DCWV.
I inked all of the edges with ColorBox.   I hope you like my final Advent Calendar of the year.  I must say, I had a couple of ideas for additional calendars which I hope to make for next year.  One would be using some of the Tim Holtz ideas to do tags on a big ring with a very grunge feel to it.  I'm thinking it would be great for one of my 20 something brothers.  

Thank you for looking at my latest creation.  I hope you have enjoyed it or at least learned something.