Showing posts with label heat transfer vinyl. Show all posts

Saturday, November 12, 2011

Dear Santa T-Shirt

Hello Friends -

I'm unbelievably excited about a little project I created today.


I'm certain you are now looking at this and thinking, "Yeah, I've seen those before.  She needs to get a life."  Well, we can debate whether I need to get a life or not but...

The reason I am so excited is this is a piece of paper the Wonderkid wrote on.  I then took his actual writing and scanned it into a JPEG.  The JPEG was then traced directly into SCAL and voila:

The Wonderkid's writing on his own shirt.  Don't you absolutely love it?  I will say, it took awhile to cut so I think I might want to figure out if there is a way to even it out so it cuts ALOT faster.

I'm just so pleased with myself.  I really can't see straight.  What do you think?

Saturday, October 1, 2011

T shirts for a new little person

Hello Friends -

Today I have a series of t-shirts for a little guy in the family.  I should have done these a couple of weeks/months ago but I'm going with "better late than never".  While doing shirts for the new baby, I had to make something for his big sister.

Here are the brother/sister shirts.

The font I used is my favorite for little kid stuff.  It is called Kristin.  I normally make it a little wider for cutting purposes but it isn't a requirement.  You can't tell in this picture but the lettering on the t-shirt is pink on brown.  The onesie is cream on brown.  I would have liked to use light blue on the brown but I didn't have any handy.

Here is a close-up of the lettering.

One more shot of the onesie.  I think this one is simple but fun.

The little one's Dad and uncle both went to St. Ignatius (a Catholic boy's school in the same town as they live).  Not long ago, Dad tweeted the year of his son's graduation from Ignatius so I thought this would be a fitting shirt.  I used the Cricut Varsity font for this shirt.  I must say, I love that cartridge for so many different things.  I needed to put the Wonderkid's name on his soccer(football) jersey.  Instead of hauling it all off to some store where they would have charged me $1 per letter, I just cut the letters out and stuck them on.  Voila, personalized jersey.

Back to the onesies for the little one.  The little one's Dad played/s Lacrosse.  So, this seemed fitting.


Of all the shirts, this one gave me the most grief.  I didn't have too much trouble finding an SVG of the lacrosse sticks but then I wanted to arc the letters instead of putting them in a straight line.  Well, that is easier said than done.  I asked over on the SureCutsALot Users board and the wonderful Kim gave me a great recommendation.  You create what you want in Word, using Word Art, and then make a jpeg of it and trace it in SCAL.  In the end I hand placed the letters on the bottom arc.  The top arc I used the path feature.

Weeding the nets of the lacrosse sticks was a bit of a pain also.  It was a matter of being able to see each section and pull it out.  In the end, I really like the way it came out.  I'm having trouble deciding which is my favorite.

I have a few shirts in the works for the Wonderkid.  They should be a little more fun and the types of shirts other people might want to scraplift (I can't imagine anyone wanting to use these ideas but ...).

Tomorrow, I have some cards I made and some subway art I designed for a birthday.  Until then...


Tuesday, March 15, 2011

St. Patrick's Day T Shirt

Last night I made the Wonderkid's t-shirt for St. Patty's Day.  I was feeling very together since I have another two days before he needs to wear it.  This is what I ended up making.


The shamrock is from a shape card I won from The Cutting Cafe.  Regina has some fantastic items in the store.  I'm especially happy with her sentiments in a circle and some of the background papers.  The shamrock originally had a mirror image attached to it but I "hung" it off the edge of the mat and only cut one shamrock.

I would have preferred a different color of green for the shamrock but I ran out of the dark green.  As soon as I'm done with this post I'm off to order more Heat Transfer Vinyl (HTV) from Nick at CraftVinyl.com.

The "100% Green" and the recycling symbol are from the Spring Holiday Cards cart.  A little hint if you are cutting it out using vinyl or just looking for the "off cut", put a smaller box around the design so you don't waste all of your vinyl.

Here is a screenshot of what I mean.

You can click on the picture to make it larger.

The original design has a box that is much bigger.  You can see I used the "hide contour" feature for that box and for the face on the recycle symbol.  The edge of the original box is between th 6 and 7 inch marker.  I put a much smaller box around it using my George and Basic Shapes cartridge.  I have that cart and the Plantin cart in my Jukebox at all times.  That way I don't need to switch it back and forth because I use it constantly.  

The other reminder, don't forget to flip your design when using HTV.  You will be cutting on the "wrong" side which is the side that is less shiny.

For this shirt the white layer went down first, the green layer was next and the black was the final layer.  The Wonderkid has already given this shirt his approval.  He told me this morning it is "Bootiful".  I was afraid we would have a fight about whether he could wear it today or had to wait.  Delayed gratification is not his strong suit.  I wonder where he gets that?

Pop back tomorrow for a couple of cards (I think I'm going to be up to my ears in green this week) and maybe a banner or some fun stuff for this weekend's Farmer's Market.

Monday, February 14, 2011

Love Bug Shirt

This is what I made for the Wonderkid to wear to school today.  I thought he needed a new shirt for Valentines Day.  I partially chose this because one of his teachers refers to him as a love bug.  The bug and the words "love bug" come from Simply Charmed cart.  The "I'm a" is Mickey Font.  Using Design Studio I added the heart to the "o" on "love" instead of the smiley face from the cart.

I used four colors of heat transfer vinyl (htv).  I use my regular iron but I iron it on my washing machine as opposed to an ironing board.  I've heard other people say they used a cookie sheet, I think that is likely to work also.  I also use a small sheet of teflon to make sure it gets good and hot. 
Here is a close-up of the shirt. It is tought to tell in these pictures but the lettering is pink and the heart is pink.  It looks pretty cool in person, a little washed out in this picture, though.

What do you think? Is this fun or what?

Saturday, September 4, 2010

Personalized tshirts

One of the reasons I love making t-shirts is it allows me to personalize them.  While the Sesame Street characters are fun, they aren't as meaningful as this next set. 

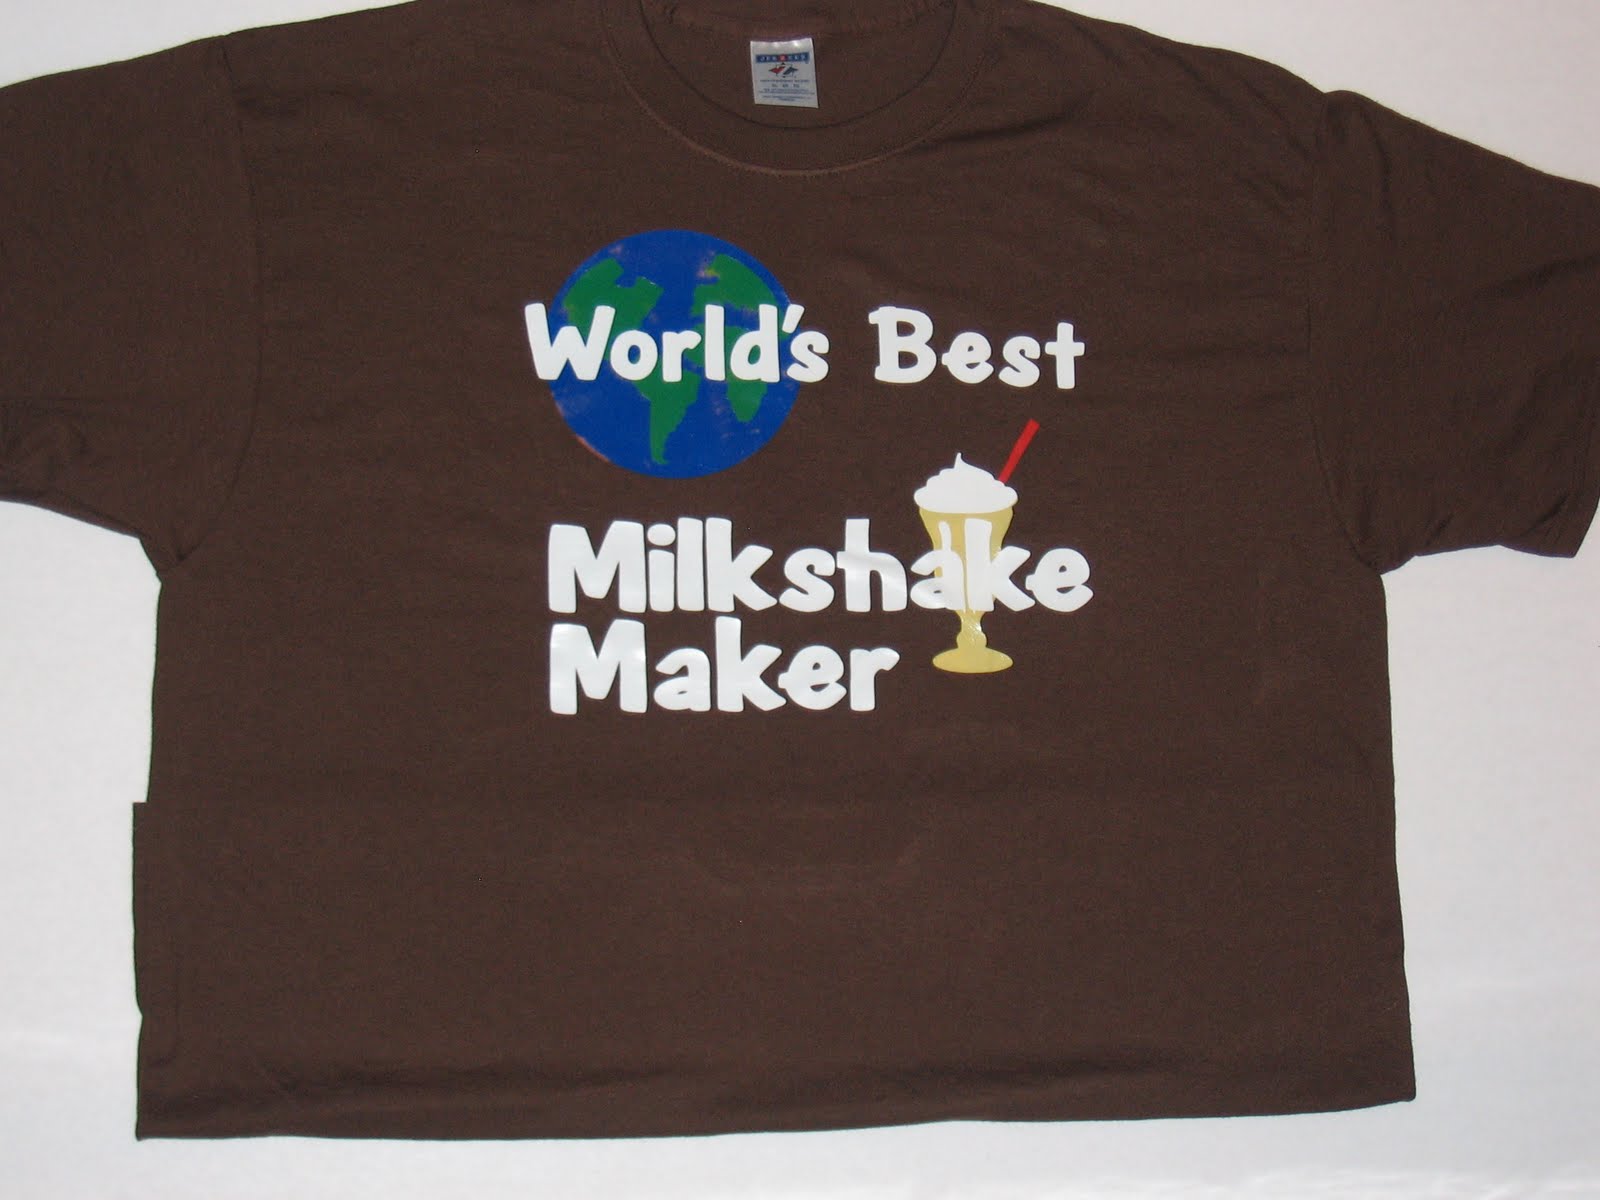
Lets start with a little back story.  Growing up, my youngest brothers would have a milkshake made by our Dad almost every night.  It is one of the few things Dad makes.  You know how some people remember Dad making breakfast on Sunday mornings or that one special dish that Dad would make?  Well, in my family, Dad makes milkshakes.  This tradition continued on to the Wonderkid.  He would ask PopPop for a milkshake most nights.  The funny thing is, he really just wanted to eat the ice cream but suggestions that he could do that without PopPop making a milkshake fell on deaf ears (or the ears of a three year old). 

So, I made the Wonderkid and PopPop t-shirts. 

First the Wonderkid's t shirt.

The milkshake can be found on the From My Kitchen cart.  I forgot to flip the image when I cut it so it is actually backwards.  This is OK as long as none of the image is flipped. I made this shirt 6 months ago.  As you can see, the letters are all in place after many many washings. 

Then I made this shirt for PopPop.
The lettering comes from Pooh Font.  The graphic of the earth (I've used this in so many formats.  I'm almost getting tired of it.) comes from Going Places and the milk shake is the same one I used in the Wonderkid's shirt. 

What do you think of these shirts?  I can promise you, they won't be wearing them out at the same time.

Thursday, September 2, 2010

Mommy's Little Monster t-shirt


When I was pregnant with the Wonderkid I was sick the ENTIRE time.  So, I started referring to him as "Mommy's Little Monster".  This was said only in the most affectionate terms... most of the time.  When he was little, I was able to buy all kinds of cute onesies with dinosaurs and such that said, "Mommy's Little Monster".  I haven't seen any in his size for quite some time.  

The first time I saw the Mini Monsters Cart I fell in love with it.  I'm not much of a pink flowers and fairies kind of a gal.  Provo Craft seems to have a dozen carts of princesses and fairies.  I'm sure they know their audience and they are great sellers.  I am not the one that is buying those carts.  

picture from the Cricut website
Do you see that monster hopping out of the hole.  It spoke to me immediately.  

When this cart arrived last Saturday,  I immediately pulled it out and designed this.
Isn't it adorable?  The lettering is Mickey Font cut at 1 inch.  The monster is cut at 5 inches.  

The layering on this is very easy.  After I designed the shirt, I cut it all in paper so I knew how it would piece together and to make certain the colors would work the way I had them.  
In this picture you can see a slight mistake in the green piece.  I chose a piece that was a tad to small.  You can see the edge of the black where you shouldn't.  However, the Wonderkid doesn't normally stop moving long enough for anyone else to see it.

Here is a closer shot of the front.


Here is the Wonderkid wearing the shirt so you can see where the tail falls on his back.  

Whenever you are layering heat transfer vinyl (htv) you should use a hot iron without any steam.  It needs to be very dry.  I iron the shirt first to get out any moisture (which is pretty darn tough in Georgia in the summer).  Then I place the first layer on the shirt.  Remember that the "backing" belongs on the outside.  The sandwich is shirt, vinyl, backing and then the teflon sheet or a pillowcase/piece of cloth. You don't want to iron directly onto the "backing" as it will melt.  I iron it in a circular pattern for about 30 seconds then I move onto another small section.  Some htv can be peeled while it is still hot, others need to cool.  I normally use the type that needs to cool.  So I wait a few minutes (this is not easy for me so I like to do a couple of shirts at once so I have something else to do) then I peel off the "backing".  I put the next layer down and then I place the backing on top of the entire design.  Continue until you have finished all of the layers.  

The only problem with htv is no one will think that you made the shirts yourself.  They look that good. 

Wednesday, September 1, 2010

Heat Transfer Vinyl

I can't tell you how much I love heat transfer vinyl. It is used to make t-shirts, designs on clothing, etc.  Even before my Expression arrived, I learned about using freezer paper to make designs and then painting on t-shirts.  There is a YouTube video done by a young teenager where she shows you how to make a simple t-shirt.  If she can do it, I can, right?  Well, I like freezer paper designs and I've done a couple but I love heat transfer vinyl (HTV). 

Here is an example of why:

I made this t-shirt for the Wonderkid using freezer paper.

I like it, I love the sentiment and it looks nice enough.  I made it over 6 months ago and for a while it was the Wonderkid's favorite shirt.  I'm certain it has been worn at least 35 times. So, you can tell it holds up well.  There really isn't anything to peel off.

Here is a close-up of the lettering.

As you can see, the letters just aren't very "crisp".  They look fine and I certainly wouldn't throw the shirt away, but it doesn't have that "Wow" factor.

Here is a shirt I made for the Wonderkid, also in black, also using white lettering.

and a close-up of this same shirt.
While the picture may not be especially professional, the shirt is very crisp and clean.  That is the difference between htv and freezer paper.

For the Dog's Best Friend shirt I used Paper Pups and Pooh Font.  I have found for the Wonderkid, the entire design can only be about 6 inches across (He wears a youth X-small or a size 3, often considered a toddler size). 

The L'il Helper shirt was made using htv from Nick at Craft Vinyl.  He sends some wonderful instructions on how to use htv.

Here is a screen shot of the L'il Helper t-shirt
The spoon, mitt and rolling pin are all cuts on From My Kitchen.  The lettering comes from Cursive 101.  I think this is one of the easier font carts to link the letters together.  I nudged each of the letters into place and then I welded all of them.  I've been told this t-shirt is a little to feminine for the Wonderkid but I like it anyway.

The most difficult part of this entire process is lettering.  Design Studio does NOT make this easy.  It would seem that you could type your letters and then press the flip button and it would be perfect, not so fast.  Design Studio flips each letter, or graphic, not the entire box.  The best way to think about this, consider the letters are each on their own axis.  Design Studio then rotates each letter half way around.  So, if you are doing lettering on a t-shirt you need to type it backwards and then hit flip.  For example, I typed li"L repleH then flipped the letters.  Because I'm always afraid I'll mess this up, I have a Preview Page where I put the design going the right direction.  Then I place it where I can see it and I type it starting with the last letter and ending with the first.

The other difference when using htv, I lay the design out exactly as I want it to look on the shirt.  When I normally cut something, I push everything as close together as possible so I don't waste any paper.  That doesn't work as well with htv.  If you weed (pull out the stuff you don't want to see, such as the inside of the l's and e's) then it is much easier and better to have it layed out exactly as you want it to look.

Here is an example of my mat when I was cutting paper.  Now, look at the earlier screen shot of the t-shirt.  The t-shirt screen shot looks like it will on the shirt, not so with the following screen shot.

These are part of the brownie toppers I made recently.


Tomorrow I will show a couple of layered designs using htv.  Check back so you can see one of my favorite shirts for the Wonderkid.