Showing posts with label gift. Show all posts

Friday, October 7, 2011

All that Glitters

Hello Friends -

Today is my first day of guest designing with the wonderful ladies at Humbug Hall. One of the reasons I love their challenge site is they always come up with interesting little twists.  This week was no exception.  They challenged us to use... Glitter.  Have I mentioned how much I HATE glitter.  I tend to ban it from my craft room.  It truly doesn't matter what you do, you end up with glitter EVERYWHERE.

So, when I first read the request for glitter, after I stopped shuttering, I immediately thought of these lovely glass bulbs.  The idea of trapping all that glitter inside the bulb appealed to me.  These have been all the rage for a few years now.  My twist this time, the flattened bulb.  Isn't it wonderful?  It is also so much easier to put vinyl on something that isn't completely round.

I'm not much on housework so it took some doing to find the floor polish.  Eventually, I located the correct aisle in my grocery and then the correct polish.  For those on my side of the pond, you use Pledge with Future Shine.  If you are on the other side of the pond, or down under, I've been told you can use any floor polish that gets a bit sticky as it dries.

Here is a video on how to make these little buggers.  There are tutorials all over the web if you need more info but they are easy and a ton of fun.  I made them last year with a dozen little children.  They loved it, the ornaments came out wonderful and the glitter stayed away from my house.

Here are a couple more pictures of the Christmas ornaments.
I love being able to make something a little more personal.  This is one that I thought I could send to my cousins for their baby's first Christmas.
I put the year on the back for them.

I love the look of this one.  The green on that sparkly red.  Isn't it yummy?

For everyone looking for their card fix, I have two more little projects.  The first was inspired by a lovely lady over at Mod Paperie.  Theinly has some of the most incredible creations.  She recently introduced me to a new site called idiecut.com.  They have some wonderful SVGs to be used in your electonic cutting machines.  This little guy was so cute, I couldn't resist trying.

I like Theinly's take on him better than mine but I thought he was fun and he has a bright glittery nose.  I ran his antlers through my cuttlebug with a Tim Holtz embossing folder, the wood grain one.  I thought it gave a bit of added fun.  Instead of messing around with two little itty bitty eyes, I used a couple of gems.  It was a lot easier and gave him some dimension.

Finally, the best glitter in my book, Stickles.  It doesn't get away from you, you don't really need to be fast to keep it from spilling and it comes in many yummy colors.  I used my Cuttlebug on this card also.  This time it was a holiday folder from Cricut. I thought it would be fun to carry the Christmas trees over from the embossing folder, to cutting them out (the basic Christmas shapes that came with SCAL had the perfect tree once I stretched it) and even placing them on the tag.

I made the tag by using the path feature in SCAL and then printing instead of cutting.  I'm trying to teach myself to write on a path using MS Word or some other program but I haven't worked it out.  This seems to be doing the job so far.

I recommend hopping over to Humbug Hall for a look at the lovely creations by Ann, Max and Brenda.  They have been having crazy weather while here in the South (that is the US South) we have had the most incredibly beautiful weather.  It is making it tough to stay indoors and work or craft.  We only have about two weeks every year when you can have the windows open and enjoy the great outdoors (in between it being so hot and humid that you practically drink the air and so chilly and rainy that you want to bundle next to the heater).  So, the Wonderkid and I have been having a nice time out of doors.  Hopefully you are having more of my weather than the Baltic wing of Humbug Hall.

I'll see you tomorrow for some more fun.

Saturday, September 3, 2011

Lettering Delights Gift Bag

Hello Friends -

Today I needed to whip together a quick gift bag for the Wonderkid to take to a birthday party.  It was for a 7 year old boy so I didn't want it to be too babyish.  The Lettering Delights Animal Boxes and Bags were perfect. 

I cut the bag out of a 12 x 24 piece of black cardstock.  That made the entire box about 7 inches tall (not a huge gift bag but large enough to hold part of the gift).  I sized the robot to fit on the front of the bag.  


This is the inside so you can see there is a good bit of room.  I also used velcro to close the bag.  It was still sticking after the Wonderkid opened and closed the bag a half dozen times.  I used a couple of glue dots to keep it on.


Here is a side view of the bag with the robot.  All of the pieces of the robot were cut out of Core'dinations cardstock.  I wish they had 12 x 24 pieces of Core'dinations but since they don't I had to ink the edges of the bag.  I can't stand the white core showing through the edges and cuts.

Finally, here is the bag front with the flap up.

What do you think of this sweet little robot.  I, also, made the quickest card ever but I didn't take a picture because I had the Wonderkid at my feet wanting to leave for the party.  It is amazing how quickly you can make a card with that kind of motivation.

Have a good day and I hope to be back this weekend with my Bah! Humbug! creation.  It has been a fun project.


Wednesday, May 11, 2011

Bah Humbug Green or Recycled Challenge

Hello Friends -

I haven't been able to take part in the challenges from the lovely ladies of Humbug Hall.  I must say, I've missed those crazy gals.  However, I was serious about taking part this week.

They challenged everyone to either recycle something or use green or both.  Well, you know me, I must be an over achiever, so, I used both.  I didn't make a card, though.  As much as I need lots of Christmas cards, I also need a ton of gift tags. I've been working on my stash of cards but what would I do when it came time to wrap all those presents?  Well, I've started to build a tag stash also.  I'm thinking about trying to do a tag similar to the cards I've been doing.

So, here are some tags.  I made a total of 12 tags (one 8 1/2 x 11 piece of cardstock).  The green for the trees was all from my scraps.  The cardboard came from a box of paper I received and the stamps are all from My Pink Stamper.  I find two simple cuts, one from Doodlecharms and the other from Christmas Cheer.  Each tag is slightly different, except for the back.


I pulled little bits of things out of my stash.  I think this one turned out well.


I hope the Mavens of Humbug Hall will find my humble offering acceptable.

Thursday, March 3, 2011

The MOJO is back

I considered taking a break on any crafting until next week.  I'm going to a Teresa Collins class hosted by my LSS, EMI Scrapbooking, on Saturday and this morning my guiltiest of pleasures happened -- Cleusa our cleaning lady came.  While this is one of my favorite days, it also means EVERYTHING gets put away, including all of my crafting items.  With all the interruptions (including life), my mojo was seriously shaken.

Add to all the other life things that happened, this box should have been very easy and IT WASN'T.  It is two of the cuts on the Cricut cart Bags, Tags, Boxes and More.  Normally, a cut like this would all be on one button.  The outside might be a regular button and the inside would be the shift of that same button.  For some reason, they put these two parts of the same box on two separate buttons.  OK, enough of the cut I'm too excited about the final product to get hung-up on the silliness of the cuts.

Lets get into the fun part.

First, the paper.  I am a huge fan of Jillibean Soup. I bought some of the Christmas Kraft paper last fall and I haven't been able to bring myself to use it.  I just take it out and stare at it every now and then. However,  I couldn't wait to play with it and I love everything about it.  This is part of the Atomic Soup line and is called Quart of Quarks.  Not only do I love the paper, but I think the names are all so cute -- everything is soup based.

Whenever I'm making boxes and other 3-D items, I liked to use double sided papers so the inside is as pretty as the outside.  Don't you love the other side of this paper?

The other exciting part of Jillibean Soup -- there is a matching Core'dinations stack.  Yippeeee!!! This is one of the embossed papers.  The stack has red, brown, green, blue and a white washed salmon/peach color. I sanded the front to bring out the numbers a bit more.   Now, I'm not normally one to buy the embellishments from a line.  I would rather make/find my own, but the embellishments with this line are so much fun.  The button comes from the Jillibean Cool Beans.    And...

Check out this very fun sticker border of the periodic symbols.  (You can click on the picture to make it bigger).  Doesn't it look perfect with the paper and the digi stamp.

The stickers next to Geeky Glen are also part of the Jillibean Soup page of stickers.

I've completely ignored the other piece of this project, the incredible digi stamp from Tiddly Inks.  You know how much I love Christy's images and playing along with the Tiddly Ink Challenge.  Part of why this works so well, the image is PERFECT.  I couldn't be happier with the entire package.  I am going to design a set of cards (I'm sure you'll be seeing them soon) which I'm going to put in this box and send to a Geeky friend of mine.  Don't you think she'll LOVE it?

This project was started as a challenge at Flaunt if Fridays.  Normally I don't consider myself a flaunt it kind of a person but this project has me excited enough to FLAUNT it.

Thanks for looking and hopefully I'll have something for you tomorrow.

Wednesday, February 23, 2011

Bah Humbug CD Challenge

This week's challenge at Bah Humbug Manor, use a CD/DVD.  They were very open to how/what we did as long as we stuck to the theme.  Well, I had a wonderful time with this one. 
This is the front cover of my project.  I wanted it to look like a wrapped up present.  The lettering is cream colored vinyl cut from Lyrical Letters cart with my Expression.  The paper is from Recollections (Michael's Brand) Old Fashion Christmas. 

Here is the front and back.  Look, I was able to get the ribbons to line up from the front piece to the back.  By the way, that was a pain but I'm so pleased with the way it looks.  So, you aren't really impressed so far, are you.  Anyone can put a ribbon around a piece of paper you silly girl.  Right?

This is the inside.  On the left I continued the paper from the outside.  It is a new piece of course, I had to cover up that ribbon I used on the outside.  The right is a picture with the black vinyl stuck above it.  Again, I used Lyrical Letters.  If you read my blog for any period of time you will notice I never hand write.  I hate my handwriting so I use it for nothing more than list making (I make quite a few lists, though so I haven't gotten out of practice, yet). 

Here is a close-up of the left panel.

And here is the CD.
It fits in the case still.  I used my crop-o-dile to make the hole in the top of the CD.  I was very nervous when I punched the hole, afraid I would crack the CD.  It was no problem.  It punched a hole easily.  I then used some wire from my stash (I know, why do I have wire in my stash, yet another thing I don't know). 

This is the back of the CD.  I decorated it so the CD could be used as an ornament at Christmas time.  I'm thinking about sending this to the Wonderkid's Great Grandma.  I think she will love it and I think she will want to hang it very prominently. 

Here is the front of the entire package. 

What do you think?  I'm considering making a few of these and using them for gifts. When I make the new ones, I'm thinking I should emboss the paper from the cover.  Any other suggestions?

Don't you think Granny Mac and the Grandma's will love these.  And, how about the Wonderkid?  Isn't he a cutie?  Who could turn down that little guy?

Sunday, January 2, 2011

Recipe/Photo Album

The idea for this project has been kicking around in my brain for quite some time.  However, I had planned to make it for myself.  In the end it became a present for my youngest brother.  He enjoys cooking, he finds it's a stress reliever similar to how I feel about most cooking. So, I made this for him for Christmas.

 This is the cover of the book.  I planned on using my Bind-It-All for the binding but in the end it was a little over 2 inches thick and no one makes the binding rings large enough.  I then planned to use O-Rings but the largest size you can buy at my Office Depot or Staples is 2 inches.  It was a little tight but I was able to close them.  I'm working on getting 3 inch rings so it will flip easily.


Here is a picture of one of the inside pages.  It is actually an envelope mini-album.  I used these envelopes
The envelope measures 9.5 inches by 6.5 inches.  I have a ton of them around and use them constantly.  They were the perfect size for this project.  It meant each recipe card could be 8.5 inches by 6.45 inches and the pages measured at exactly half of an 8.5  by 11 inch piece of paper.  I slit one side of the envelope, sealed  the top as though I was mailing it and then covered them.

 This is one of the pages with the recipe card pulled out.  I made a frame for the picture using rolling pins found on "From My Kitchen".  The phone is from the same cart.  All of the recipe cards are made using a box from George and welding a tab off of "From My Kitchen".

Here is another page. I used the same rolling pin but this time I used the pie from Paper Dolls (I can't remember if it is Dress Up or Everyday). 
 This is the envelope with the recipe card inside.
 Now pulled out.  You can't read it very well but I used my Cri-Kits and wrote on the frame of this page.  I used the same paper for the frame so it would blend in nicely.  I also used my Cri-Kits to write the name of each recipe on the tab.  I then colored them in using alcohol inks.

 This is the Pumpkin Pie page.  I make the pumpkin "glop" for the pies (not the canned pumpkin filling) that is why it explains which pumpkins to buy when making pumpkin pies.  I had an extra pie so I put it on the recipe card instead of the envelope.  The pie is made using "From My Kitchen" cart.  The pumpkin is from SVGCuts' Heirloom Pumpkins. 
 This is a long recipe so it goes onto the back of the recipe card.
Here is the back of the recipe card and the back of the envelope.
 I thought this was another great page.  The turkey is from Doodlecharms cart.  Again, you can see the recipe card inside the envelope...
and outside the envelope.

Here you can see the pages inside the back cover.  I used almost exclusively DCWV stacks for this project (The Natural, Autumn Splendor and Bon Voyage).  It was wonderful to be able to go to a couple of stacks and find the tons of paper I need for this.  I have used most of my pattern paper from The Natural and Autumn Splendor.  Having the matching cardstock was FANTASTIC.  The one other paper I used is here on the front flap and the inside cover.  It is Tim Holtz's Seasonal stack.  Oh my goodness, I'm absolutely in love with this stack.  He made one page that is all old recipe cards.  It was the most perfect paper for this project.  The only problem, I didn't want to cut the paper.
This is one more picture of the inside of the book.  I used Winter Frolic for the sledder and snow angel.

As I was writing this post, I decided it is tough to follow exactly what I did.  So, I thought I would do a step by step tutorial.
Envelopes/Outside Pages
1.  Get your envelopes and measure them.
2.  Split them on the side you want to insert the recipe cards.  I used the right side.
3.  Seal the envelopes.
4.  Cover the envelope front and back.  I made certain the bottom and right side was even on all of my pages. I knew the top was likely to be inside the bindng so less important to be even. I used my ATG gun to afix everything.  This project used up more than 3 rolls of ATG tape.
5.  Set the envelopes aside.

Recipe Cards
1.  Cut out enough cards for all of your recipes.  I ended up doing 20 recipes.  I used manilla folders (the kind you use for filing) for my pages.  You don't need anything as heavy as chip board but you could use it if you wanted.
2.  Cut out your pattern paper to go over the front and back of your recipe card.  Cut a space the appropriate size to insert your recipe under the pattern paper.  (You could just adhere the recipe to the top of the pattern paper but I thought it looked a little more professional by creating a frame).
3.  Print out your recipes and afix them to the manilla folder.
4.  Afix the pattern paper to the recipes and manilla folder.  Make certain to remember if you have a recipe that continues onto the back side of the recipe card.

Putting the recipe cards and envelopes together.
1.  Decide which cards will go into each envelope.
2.  Add photos and embellishments as your desire.
3.  Place them in your desired order and create a stack with them.  You will need to measure this soon.

Cover
1. Measure the outer edge of your recipe cards inside of the envelopes.  Add enough size to make certain your cover is larger than your pages.  This will allow the cover to protect the tabs of the pages.  You could make this like a traditional word book where you can see each page but I wanted it to have a little more protection. 
2.  Measure the height of the stack of all of the embellished envelopes with their recipe cards inside.
3.  I used two pieces of chip board for each piece of the cover and then added a piece of cardstock around that.  Cut the chip board to size.
4.  Cut the pattern paper 1/2 inch larger than the chip board.  For the back cover, which will have a flap that goes all the way around to the front and clasps, add another 1/2 inch.  This will pattern paper will be the outside cover of the book.
5.  Cut a piece of coordinating paper the exact same size as the chipboard.  This is the inside cover of the book.
6.  Lay out your back cover, large piece, 1/4 inch, piece the height of the book, 1/4 inch, and flap.  My flap was 2 inches which happened to be the same height as the book.  When you adhere the paper to the chipboard, make certain you score it and leave enough room for the book to bend.
7. Choose your closure.  I was very simple and used a small round piece of velcro which I adhered using zip dry.  You could do any number of neat things to keep it closed.  Some of the Tim Holtz closures would be very cool.
8.  Using a Bind-It-All, Crop-o-dile or a hole punch, punch the holes in the cover and all of the pages.  I made certain I removed the recipe cards so they didn't get punched or cut while I was punching the pages.
9.  Assemble.

I hope this tutorial made it easier to understand how I did this.  If you have further questions just leave me a comment and a way to get back in touch with you.  I'm sorry this was so long but I hope it provided some inspiration for you.  Thank you for reading and looking. 

Thursday, December 23, 2010

Calendar - Part 2

This is part 2 of my Calendar project.  If you missed the first post, I suggest going back.  It discusses all of the great features of Designer's Calendar.  You can find the post here.

Now, my regular readers know how much I love my carts.  I have lots of them and find them to make things easier for me.  However, I also love my SCAL.  It gives me additional options.  Today I'm going to show a couple of pages I made using SCAL.  I bought some items from SVGCuts and Lettering Delights.  For those people that missed it, Lettering Delights is now selling SVG files ready to cut.  I've been using their clip art and doodlebats and preparing them for cutting myself.
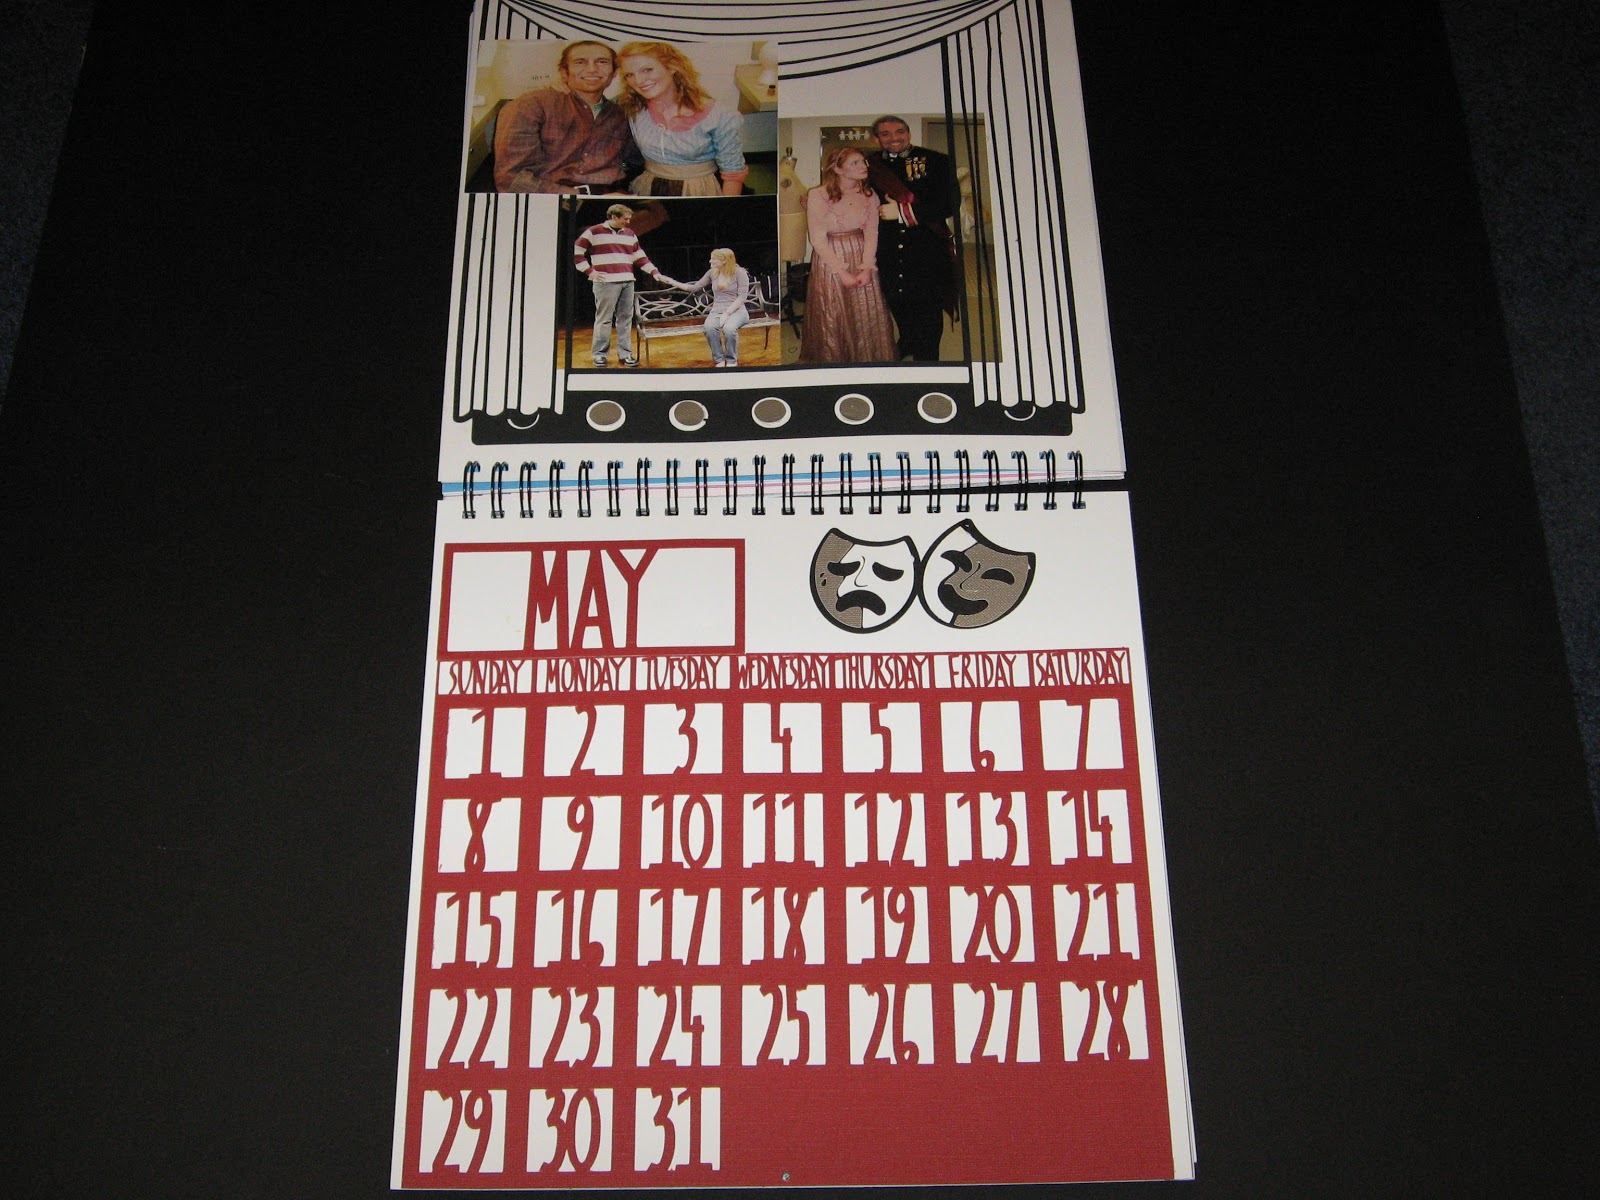
 This page was made from a set called Lights, Camera, Action.  I bought the set over the summer but haven't had a chance to cut it until this week.  I did very little to change it in order to cut.  I took out about half of the lines on the stage and I moved the parts of the mask (already divided) so that I could cut them in different colors.
 Here is a better picture of the stage.  I also cut the lights separately in silver to give it a little bit of texture.  It is very delicate but I thought it made a great frame (even if I had more pictures than it would hold).

Don't you love the masks?  I think they came out fantastic.  This is an example of why I love having SCAL.  It allows me to cut things that Provo Craft isn't likely to ever create.  They have some fantastic things but I love the flexibility of creating things in my imagination.


 I made this page using SVGCuts' Serene Leaves and 3D Fall Cards.  My picture doesn't properly show the the frame on the bottom card.  It has oak leaves going up the side of the card.  The ribbon comes from Ribbon and Bows Oh My.  I purchased one of their Convenience Packs after Okie Ladybug was raving about how great they are.  I must admit, I think she is correct.
This picture didn't come out very good.  It looks like it has the measels but those are actually little leaves.  I love this paper (DCWV Amber Autumn Stack) but it is almost impossible to cut it using my Cricut.  Some of the leaves are glittered, some are embossed and some are a flat imprint.  It makes it gorgeous but it causes so much grief for the cutter.  I ended up cutting this 4 times (twice with a brand new blade) and it still wouldn't cut cleanly.  However, I LOVED all of the matching cardstock.  I think all four or five colors were in the pack.  And even with all of those options I ended up using some of the patterned papers that coordinated for the orange leaves.

Both of these frames came from SVGCuts.  I believe at least one was free (maybe both).  If you are on their email list they email you a link for a free cut file at least once a week and maybe twice.  Many of them are one cut from some of the files they sell.

 The frame on this one is from SVGCuts also.  The paper is from Paper Studio's A Country Christmas.  It has the cardstock and pattern paper in the same stack.  I decided to use some different techniques on this page.  I used Rock Candy Crackle Paint on the snowmen and Glossy Accents on some of the snow flakes to give them a bit of shimmer.  The snowflake brads are also from Paper Studio. 


I used some snowflake stamps to give the white paper a little more interest.  I initially cut the calendar as a test cut but then I decided to use it since it worked. 

I hope you have enjoyed this project.  I was able to finish it in less than a week (I didn't have much of a choice, we were exchanging gifts a couple of days ago) but a few of the pages are lacking because of the speed.  If anyone can help me with a way to share the cut files, I would be happy to load them up and offer them to anyone wanting to make a 2011 calendar.

Enjoy, I'm hoping to be able to post a couple of additional projects before Christmas.