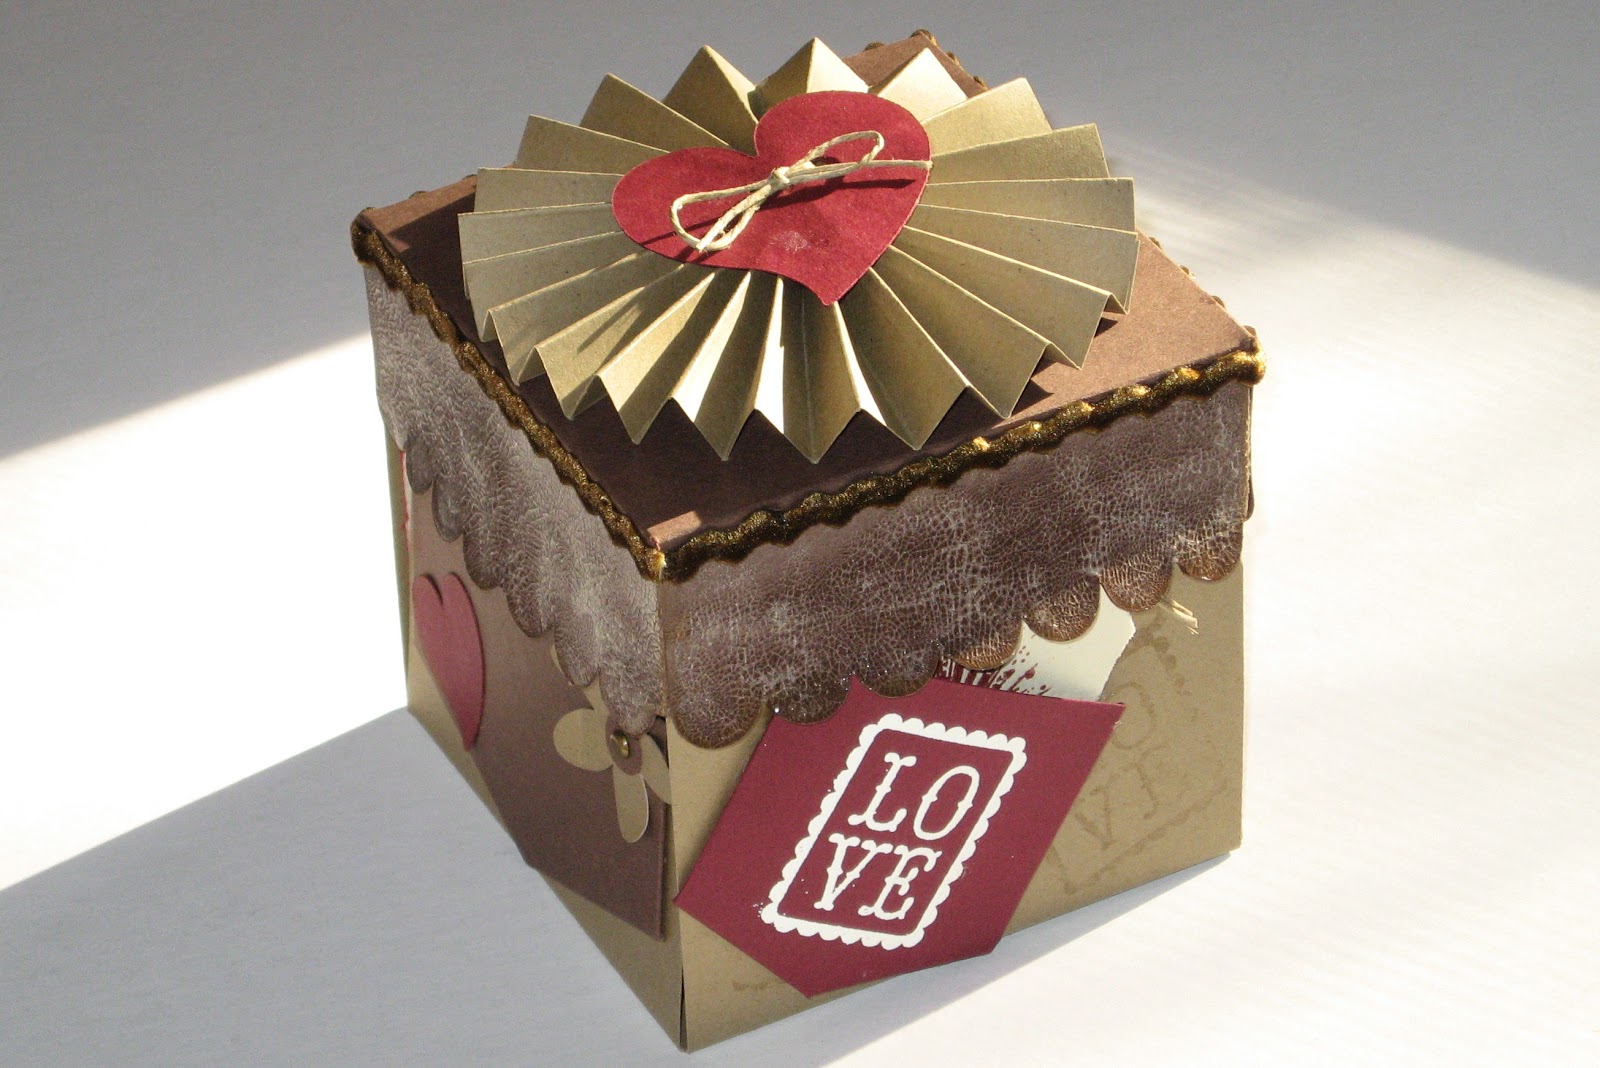
I want to show you a fun project today. It is an explosion box using kraft paper, brown paper and cream paper with just a little bit of red. I really pushed myself on some of the techniques but I'm so pleased with the way it turned out. It just goes to show, trying something new can be very rewarding. The cuts were all done using my Cricut (it requires a 12 x 12 mat) and SCAL2. I used an SVG from SVGCuts. You can find the explosion box here.
First the top. I have never made paper rosettes before. I love them, I've been eying them but I hadn't tried them. I must say, I think I'll be doing more. This rosette is two strips of kraft paper, each 2 inches wide. I then scored them every half inch, glued them together and pushed the middle down so it would fan out for the rosette. I then glued a one inch circle to the back of the rosette and the heart with the twine through it to the top of the rosette.
Here is a close-up of the top.
On the edge of the top, I glued a piece of velvet ric-rac from Creative Charms. I love the way the velvet ric-rac looks with the kraft paper. It is elegant with out being inappropriate. I also used Crackle paint along the sides of the top. I used Rock Candy so it would have texture without adding color.
I think this side is my favorite. You can see the velvet ric-rac again. I heat embossed the LOVE stamp on the pocket. I also heat embossed a great Tim Holtz stamp to the tag.
Isn't that fun. The final thing on this side, I used Versamark to give the kraft paper a little bit of texture. I stamped the LOVE stamp under the pocket and through out the side.
This is another side. The flower is part of the cuts from SVGCuts. The brad in the middle is one of the very fun ones from Creative Charms.
Here is the explosion box opened up. Doesn't it look fun. All of the pictures were taken at one sitting this last Thanksgiving.
You can see more of the velvet ric-rac and the brads in the middle say "We Love You". They are from the Spare Parts by the Paper Studio. It is the Hobby Lobby line of products.
Here you can see more of the mats. I put pictures on the back of each side, in addition to the front. I never print pictures at wallet size (and normally don't know that to do with wallet sized pictures when I get them) but this was the perfect size. On the inner pages I really couldn't frame or mat them but the second and third level was perfect for matting.
One last shot of the pages.
I think there will be more explosion boxes in my future. They are sooo much fun. Thank you for looking and let me know what you think.
Showing posts with label mini album. Show all posts
Sunday, January 30, 2011
Sunday, January 2, 2011
Recipe/Photo Album
The idea for this project has been kicking around in my brain for quite some time. However, I had planned to make it for myself. In the end it became a present for my youngest brother. He enjoys cooking, he finds it's a stress reliever similar to how I feel about most cooking. So, I made this for him for Christmas.
This is the cover of the book. I planned on using my Bind-It-All for the binding but in the end it was a little over 2 inches thick and no one makes the binding rings large enough. I then planned to use O-Rings but the largest size you can buy at my Office Depot or Staples is 2 inches. It was a little tight but I was able to close them. I'm working on getting 3 inch rings so it will flip easily.
Here is a picture of one of the inside pages. It is actually an envelope mini-album. I used these envelopes
The envelope measures 9.5 inches by 6.5 inches. I have a ton of them around and use them constantly. They were the perfect size for this project. It meant each recipe card could be 8.5 inches by 6.45 inches and the pages measured at exactly half of an 8.5 by 11 inch piece of paper. I slit one side of the envelope, sealed the top as though I was mailing it and then covered them.
This is one of the pages with the recipe card pulled out. I made a frame for the picture using rolling pins found on "From My Kitchen". The phone is from the same cart. All of the recipe cards are made using a box from George and welding a tab off of "From My Kitchen".
Here is another page. I used the same rolling pin but this time I used the pie from Paper Dolls (I can't remember if it is Dress Up or Everyday).
This is the envelope with the recipe card inside.
Now pulled out. You can't read it very well but I used my Cri-Kits and wrote on the frame of this page. I used the same paper for the frame so it would blend in nicely. I also used my Cri-Kits to write the name of each recipe on the tab. I then colored them in using alcohol inks.
This is the Pumpkin Pie page. I make the pumpkin "glop" for the pies (not the canned pumpkin filling) that is why it explains which pumpkins to buy when making pumpkin pies. I had an extra pie so I put it on the recipe card instead of the envelope. The pie is made using "From My Kitchen" cart. The pumpkin is from SVGCuts' Heirloom Pumpkins.
This is a long recipe so it goes onto the back of the recipe card.
Here is the back of the recipe card and the back of the envelope.
I thought this was another great page. The turkey is from Doodlecharms cart. Again, you can see the recipe card inside the envelope...
and outside the envelope.
Here you can see the pages inside the back cover. I used almost exclusively DCWV stacks for this project (The Natural, Autumn Splendor and Bon Voyage). It was wonderful to be able to go to a couple of stacks and find the tons of paper I need for this. I have used most of my pattern paper from The Natural and Autumn Splendor. Having the matching cardstock was FANTASTIC. The one other paper I used is here on the front flap and the inside cover. It is Tim Holtz's Seasonal stack. Oh my goodness, I'm absolutely in love with this stack. He made one page that is all old recipe cards. It was the most perfect paper for this project. The only problem, I didn't want to cut the paper.
This is one more picture of the inside of the book. I used Winter Frolic for the sledder and snow angel.
As I was writing this post, I decided it is tough to follow exactly what I did. So, I thought I would do a step by step tutorial.
Envelopes/Outside Pages
1. Get your envelopes and measure them.
2. Split them on the side you want to insert the recipe cards. I used the right side.
3. Seal the envelopes.
4. Cover the envelope front and back. I made certain the bottom and right side was even on all of my pages. I knew the top was likely to be inside the bindng so less important to be even. I used my ATG gun to afix everything. This project used up more than 3 rolls of ATG tape.
5. Set the envelopes aside.
Recipe Cards
1. Cut out enough cards for all of your recipes. I ended up doing 20 recipes. I used manilla folders (the kind you use for filing) for my pages. You don't need anything as heavy as chip board but you could use it if you wanted.
2. Cut out your pattern paper to go over the front and back of your recipe card. Cut a space the appropriate size to insert your recipe under the pattern paper. (You could just adhere the recipe to the top of the pattern paper but I thought it looked a little more professional by creating a frame).
3. Print out your recipes and afix them to the manilla folder.
4. Afix the pattern paper to the recipes and manilla folder. Make certain to remember if you have a recipe that continues onto the back side of the recipe card.
Putting the recipe cards and envelopes together.
1. Decide which cards will go into each envelope.
2. Add photos and embellishments as your desire.
3. Place them in your desired order and create a stack with them. You will need to measure this soon.
Cover
1. Measure the outer edge of your recipe cards inside of the envelopes. Add enough size to make certain your cover is larger than your pages. This will allow the cover to protect the tabs of the pages. You could make this like a traditional word book where you can see each page but I wanted it to have a little more protection.
2. Measure the height of the stack of all of the embellished envelopes with their recipe cards inside.
3. I used two pieces of chip board for each piece of the cover and then added a piece of cardstock around that. Cut the chip board to size.
4. Cut the pattern paper 1/2 inch larger than the chip board. For the back cover, which will have a flap that goes all the way around to the front and clasps, add another 1/2 inch. This will pattern paper will be the outside cover of the book.
5. Cut a piece of coordinating paper the exact same size as the chipboard. This is the inside cover of the book.
6. Lay out your back cover, large piece, 1/4 inch, piece the height of the book, 1/4 inch, and flap. My flap was 2 inches which happened to be the same height as the book. When you adhere the paper to the chipboard, make certain you score it and leave enough room for the book to bend.
7. Choose your closure. I was very simple and used a small round piece of velcro which I adhered using zip dry. You could do any number of neat things to keep it closed. Some of the Tim Holtz closures would be very cool.
8. Using a Bind-It-All, Crop-o-dile or a hole punch, punch the holes in the cover and all of the pages. I made certain I removed the recipe cards so they didn't get punched or cut while I was punching the pages.
9. Assemble.
I hope this tutorial made it easier to understand how I did this. If you have further questions just leave me a comment and a way to get back in touch with you. I'm sorry this was so long but I hope it provided some inspiration for you. Thank you for reading and looking.
This is the cover of the book. I planned on using my Bind-It-All for the binding but in the end it was a little over 2 inches thick and no one makes the binding rings large enough. I then planned to use O-Rings but the largest size you can buy at my Office Depot or Staples is 2 inches. It was a little tight but I was able to close them. I'm working on getting 3 inch rings so it will flip easily.
Here is a picture of one of the inside pages. It is actually an envelope mini-album. I used these envelopes
The envelope measures 9.5 inches by 6.5 inches. I have a ton of them around and use them constantly. They were the perfect size for this project. It meant each recipe card could be 8.5 inches by 6.45 inches and the pages measured at exactly half of an 8.5 by 11 inch piece of paper. I slit one side of the envelope, sealed the top as though I was mailing it and then covered them.
This is one of the pages with the recipe card pulled out. I made a frame for the picture using rolling pins found on "From My Kitchen". The phone is from the same cart. All of the recipe cards are made using a box from George and welding a tab off of "From My Kitchen".
Here is another page. I used the same rolling pin but this time I used the pie from Paper Dolls (I can't remember if it is Dress Up or Everyday).
This is the envelope with the recipe card inside.
Now pulled out. You can't read it very well but I used my Cri-Kits and wrote on the frame of this page. I used the same paper for the frame so it would blend in nicely. I also used my Cri-Kits to write the name of each recipe on the tab. I then colored them in using alcohol inks.
This is the Pumpkin Pie page. I make the pumpkin "glop" for the pies (not the canned pumpkin filling) that is why it explains which pumpkins to buy when making pumpkin pies. I had an extra pie so I put it on the recipe card instead of the envelope. The pie is made using "From My Kitchen" cart. The pumpkin is from SVGCuts' Heirloom Pumpkins.
This is a long recipe so it goes onto the back of the recipe card.
Here is the back of the recipe card and the back of the envelope.
I thought this was another great page. The turkey is from Doodlecharms cart. Again, you can see the recipe card inside the envelope...
and outside the envelope.
Here you can see the pages inside the back cover. I used almost exclusively DCWV stacks for this project (The Natural, Autumn Splendor and Bon Voyage). It was wonderful to be able to go to a couple of stacks and find the tons of paper I need for this. I have used most of my pattern paper from The Natural and Autumn Splendor. Having the matching cardstock was FANTASTIC. The one other paper I used is here on the front flap and the inside cover. It is Tim Holtz's Seasonal stack. Oh my goodness, I'm absolutely in love with this stack. He made one page that is all old recipe cards. It was the most perfect paper for this project. The only problem, I didn't want to cut the paper.
This is one more picture of the inside of the book. I used Winter Frolic for the sledder and snow angel.
As I was writing this post, I decided it is tough to follow exactly what I did. So, I thought I would do a step by step tutorial.
Envelopes/Outside Pages
1. Get your envelopes and measure them.
2. Split them on the side you want to insert the recipe cards. I used the right side.
3. Seal the envelopes.
4. Cover the envelope front and back. I made certain the bottom and right side was even on all of my pages. I knew the top was likely to be inside the bindng so less important to be even. I used my ATG gun to afix everything. This project used up more than 3 rolls of ATG tape.
5. Set the envelopes aside.
Recipe Cards
1. Cut out enough cards for all of your recipes. I ended up doing 20 recipes. I used manilla folders (the kind you use for filing) for my pages. You don't need anything as heavy as chip board but you could use it if you wanted.
2. Cut out your pattern paper to go over the front and back of your recipe card. Cut a space the appropriate size to insert your recipe under the pattern paper. (You could just adhere the recipe to the top of the pattern paper but I thought it looked a little more professional by creating a frame).
3. Print out your recipes and afix them to the manilla folder.
4. Afix the pattern paper to the recipes and manilla folder. Make certain to remember if you have a recipe that continues onto the back side of the recipe card.
Putting the recipe cards and envelopes together.
1. Decide which cards will go into each envelope.
2. Add photos and embellishments as your desire.
3. Place them in your desired order and create a stack with them. You will need to measure this soon.
Cover
1. Measure the outer edge of your recipe cards inside of the envelopes. Add enough size to make certain your cover is larger than your pages. This will allow the cover to protect the tabs of the pages. You could make this like a traditional word book where you can see each page but I wanted it to have a little more protection.
2. Measure the height of the stack of all of the embellished envelopes with their recipe cards inside.
3. I used two pieces of chip board for each piece of the cover and then added a piece of cardstock around that. Cut the chip board to size.
4. Cut the pattern paper 1/2 inch larger than the chip board. For the back cover, which will have a flap that goes all the way around to the front and clasps, add another 1/2 inch. This will pattern paper will be the outside cover of the book.
5. Cut a piece of coordinating paper the exact same size as the chipboard. This is the inside cover of the book.
6. Lay out your back cover, large piece, 1/4 inch, piece the height of the book, 1/4 inch, and flap. My flap was 2 inches which happened to be the same height as the book. When you adhere the paper to the chipboard, make certain you score it and leave enough room for the book to bend.
7. Choose your closure. I was very simple and used a small round piece of velcro which I adhered using zip dry. You could do any number of neat things to keep it closed. Some of the Tim Holtz closures would be very cool.
8. Using a Bind-It-All, Crop-o-dile or a hole punch, punch the holes in the cover and all of the pages. I made certain I removed the recipe cards so they didn't get punched or cut while I was punching the pages.
9. Assemble.
I hope this tutorial made it easier to understand how I did this. If you have further questions just leave me a comment and a way to get back in touch with you. I'm sorry this was so long but I hope it provided some inspiration for you. Thank you for reading and looking.
Saturday, October 2, 2010
Halloween Squash Book
After naming this post, I realized it could be very confusing if you don't know what a squash book is or you think I'm talking about an October gourd book as opposed to a book that folds up or "squashes".
It is funny how different designs seem to make the blog rounds and then you don't see them for a while. Back in the spring, I saw a number of these little books being designed and shared. I don't think I've seen one since around May.
This is the outside cover. I used some Core'dinations Black Magic paper which I embossed and sanded. I added a couple of brads from Paper Treats. I bought a box of the brads on clearance for $1.50. I need to remember these now that Halloween season is in full swing. I embossed the cover using a second piece of the same Black Magic paper. I then cut out the circles and pop dotted them to give a little extra dimension. The ribbon used to keep the book closed is simple Rafia.
I must say that the entire time I was opening the Rafia I was thinking about one of my brothers. My next youngest brother is a rancher, former bull rider and all around cowboy. I know that if he had seen my Rafia he would have said, "You know, I've got a lot of that stuff out in the barn. I won't charge you $2.50 for that little handful. You can have a whole bail for only $10". These are the things I think about while crafting in the middle of the night. So, thanks, Jeff, but I'll stick with my Rafia.
Here is the inside before I added the cover. It is three pieces of square paper. For this book I made the inside pages 12 x 12 (I was being lazy and didn't want to cut the inside paper and I like this size because a 4 x 6 picture fits all the way across). This book requires 3 sheets of cardstock for the inside pages.
If you want clear concise instructions on how to make this book, check out this page at Splitcoast Stampers. They have some really cool projects on this site if you haven't had a chance to look at them.
Here is a close-up of the embossing, sanding and pop dotting. As you can see, I need to work on my cutting skills -- isn't that why I have a cricut?
One more.
I won't be posting on Sunday but I'll be back on Monday and I'm taking my first ever craft class on Tuesday, it is a stamping class. I'm hoping it will help me take my crafting to another level.
Check back on Monday for a vinyl project
Oh, and a happy card making day to you.
It is funny how different designs seem to make the blog rounds and then you don't see them for a while. Back in the spring, I saw a number of these little books being designed and shared. I don't think I've seen one since around May.
This is the outside cover. I used some Core'dinations Black Magic paper which I embossed and sanded. I added a couple of brads from Paper Treats. I bought a box of the brads on clearance for $1.50. I need to remember these now that Halloween season is in full swing. I embossed the cover using a second piece of the same Black Magic paper. I then cut out the circles and pop dotted them to give a little extra dimension. The ribbon used to keep the book closed is simple Rafia.
I must say that the entire time I was opening the Rafia I was thinking about one of my brothers. My next youngest brother is a rancher, former bull rider and all around cowboy. I know that if he had seen my Rafia he would have said, "You know, I've got a lot of that stuff out in the barn. I won't charge you $2.50 for that little handful. You can have a whole bail for only $10". These are the things I think about while crafting in the middle of the night. So, thanks, Jeff, but I'll stick with my Rafia.
Here is the inside before I added the cover. It is three pieces of square paper. For this book I made the inside pages 12 x 12 (I was being lazy and didn't want to cut the inside paper and I like this size because a 4 x 6 picture fits all the way across). This book requires 3 sheets of cardstock for the inside pages.
If you want clear concise instructions on how to make this book, check out this page at Splitcoast Stampers. They have some really cool projects on this site if you haven't had a chance to look at them.
Here is a close-up of the embossing, sanding and pop dotting. As you can see, I need to work on my cutting skills -- isn't that why I have a cricut?
One more.
I won't be posting on Sunday but I'll be back on Monday and I'm taking my first ever craft class on Tuesday, it is a stamping class. I'm hoping it will help me take my crafting to another level.
Check back on Monday for a vinyl project
Wednesday, September 29, 2010
Suitcase Mini Paperbag Album
Today I have a paperbag mini album to show you. I initially had the idea of making this album after seeing Kathy Files of Paper Phenomenon make mini paperbag albums as a back pack. If you get a chance, take a look at some of Kathy's great projects. She makes a lot of three dimensional things and is doing lots of cool Halloween crafts. I loved the back pack idea but I wanted to give this as a gift to an adult. In looking at the cricut carts I knew there were a number of travel related cuts. I wanted the album to be vacation/travel themed, thus the suitcase and all of the pages in the mini album. I used 16 paper bags for the pages and 34 tags or mats to go in the different pockets.
Here is a picture of the entire album looking down from the top after it has been assembled.
I found the suitcase that fit my needs on the Heritage cart. I liked the details, especially on the top of the suitcase. I must admit, it would have been easier to cover with the patterned paper if it had been a little more rounded. Using Design Studio I sized the suitcase as large as would fit on 12 x 12 mat. I then flipped the image on the other half of a 12 x 24 mat. I also added a 1.5 x 11 rectangle for the bottom of the cover. All of these were cut out (without welding) in chip board.
I bought my chipboard from Bug Junkie a few months ago. I love the way this chip board cuts. You can buy the chipboard from her on the left hand column of her website. It is just below her followers. While you are there, you should check out her lovely shape albums. She is a very talented creator.
Here is the entire thing opened up with the paper covering it. Here are the layers as you would see in this picture:
1. Layer of brown cardstock cut with the rectangle welded to both of the suitcase cuts (layer against the table)
2. Layer of chip board -- no welds
3. Layer of chip board identical to layer two
4. Layer of brown cardstock identical to Layer 1
5. Pattern paper for the front and back of the suitcase
I also cut the handle an additional 4 times so that I could use some textured paper for the feel of alligator skin. I covered the seam between the handle and the suitcase with a VERY large brad which I affixed with hot glue.
The lock for the opener is on the front but it is purely decorative. The back is where mine opens. I put a circle of velcro on the back to close the album. I used Tim Holtz locks, keys and chains. I couldn't believe how easy the chain was to cut using my Bind-It-All metal snips.
Now for the inside. The reason they call these paperbag albums is because the pockets or pages are made with... Paper bags. I actually used craft bags from HL. Below is a picture of the bag as it comes out of the package. I scored all of the edges.
Then I folded the bottom over and scored the new seam. This next picture shows what the bag looks like when you start inking. I must tell you, I scored and inked every edge. I inked so many edges that I ran out of ink in my Cats Eye Color Box chalk. I spent many an hour watching TV and inking edges. Not only are all of the bags inked, but all of the paper covering the bags is inked.
Here is a mat and a half before it has been covered in paper but after it was inked.
And here are a few of the tags I used for photo mats. Notice, they have been inked and are awaiting the pattern paper.
The paper I used to cover all of the paper bags and many of the tags and mats came from three packs. I love these paper pads made by paper House Productions. (I even bought a second pad of the European Travel pad). I first bought them at M's but then also found them at HL. The European pad has a lot of sepia tones, tans, a little bit of glitter and some grays.
The US travel has more golden tones, some tans and some greens. It has some black and red pages for Las Vegas that I probably won't use but they are fun. My favorite is the back of the South Dakota pages. It is a wonderful Native American design with a beautiful golden background.
To add a little color I also used this Global Treks tablet from Deja Views. It has beautiful rust colors, wonderful rich greens and some yummy purples.
Here is the inside of the album's front cover. I love the paper with Big Ben. The lower set of pages says, "We wander for distraction, but we travel for fulfillment." I thought that was a wonderful way to start off the book. If you notice, the book isn't especially "frilly". I used many embellishments from Tim Holtz. The tags have simple ribbons holding them together or twine or chains.
I love the way the cuts from Destinations cart look on the different pages. I wouldn't recommend cutting the Destinations cuts any smaller than 2 inches. They can get a little tricky and tough on my poor E.
I love this mat and a half with the train. The picture underneath is from Ghent and the paper clips spell out Ghent. It actually opens up for another set of pictures. I tried to add as many hidden little areas as possible.
What do you think of the Moab charm? I haven't found the pictures for that page, yet.
Remember that card you saw earlier that had been inked but didn't have paper yet? Here is another version of that car, this one had the parts cut out of it so you can see the pictures below. The one above shows the car in the pocket. The one below has been pulled out of the pocket.
These are a number of the tags that have been stamped on the back. I don't have a lot of stamps and I don't always feel comfortable stamping things. I purchased a few more travel related stamps and used them liberally through out this project. Luckily I had some of the Forest Moss Distress Inks for the green tags. I think they looked pretty good. I used Walnut Stain and Antique Linen for the brown shades.
I hope you have enjoyed my project and been inspired to create your own mini album. This one was a ton of fun, even if it was a lot of work.
Here is a picture of the entire album looking down from the top after it has been assembled.
I found the suitcase that fit my needs on the Heritage cart. I liked the details, especially on the top of the suitcase. I must admit, it would have been easier to cover with the patterned paper if it had been a little more rounded. Using Design Studio I sized the suitcase as large as would fit on 12 x 12 mat. I then flipped the image on the other half of a 12 x 24 mat. I also added a 1.5 x 11 rectangle for the bottom of the cover. All of these were cut out (without welding) in chip board.
I bought my chipboard from Bug Junkie a few months ago. I love the way this chip board cuts. You can buy the chipboard from her on the left hand column of her website. It is just below her followers. While you are there, you should check out her lovely shape albums. She is a very talented creator.
Here is the entire thing opened up with the paper covering it. Here are the layers as you would see in this picture:
1. Layer of brown cardstock cut with the rectangle welded to both of the suitcase cuts (layer against the table)
2. Layer of chip board -- no welds
3. Layer of chip board identical to layer two
4. Layer of brown cardstock identical to Layer 1
5. Pattern paper for the front and back of the suitcase
I also cut the handle an additional 4 times so that I could use some textured paper for the feel of alligator skin. I covered the seam between the handle and the suitcase with a VERY large brad which I affixed with hot glue.
The lock for the opener is on the front but it is purely decorative. The back is where mine opens. I put a circle of velcro on the back to close the album. I used Tim Holtz locks, keys and chains. I couldn't believe how easy the chain was to cut using my Bind-It-All metal snips.
Now for the inside. The reason they call these paperbag albums is because the pockets or pages are made with... Paper bags. I actually used craft bags from HL. Below is a picture of the bag as it comes out of the package. I scored all of the edges.
Then I folded the bottom over and scored the new seam. This next picture shows what the bag looks like when you start inking. I must tell you, I scored and inked every edge. I inked so many edges that I ran out of ink in my Cats Eye Color Box chalk. I spent many an hour watching TV and inking edges. Not only are all of the bags inked, but all of the paper covering the bags is inked.
Here is a mat and a half before it has been covered in paper but after it was inked.
And here are a few of the tags I used for photo mats. Notice, they have been inked and are awaiting the pattern paper.
The paper I used to cover all of the paper bags and many of the tags and mats came from three packs. I love these paper pads made by paper House Productions. (I even bought a second pad of the European Travel pad). I first bought them at M's but then also found them at HL. The European pad has a lot of sepia tones, tans, a little bit of glitter and some grays.
The US travel has more golden tones, some tans and some greens. It has some black and red pages for Las Vegas that I probably won't use but they are fun. My favorite is the back of the South Dakota pages. It is a wonderful Native American design with a beautiful golden background.
To add a little color I also used this Global Treks tablet from Deja Views. It has beautiful rust colors, wonderful rich greens and some yummy purples.
Here is the inside of the album's front cover. I love the paper with Big Ben. The lower set of pages says, "We wander for distraction, but we travel for fulfillment." I thought that was a wonderful way to start off the book. If you notice, the book isn't especially "frilly". I used many embellishments from Tim Holtz. The tags have simple ribbons holding them together or twine or chains.
![]() |
| A close-up of the Yellowstone cut from Destinations. The glue hadn't completely dried when I took this picture. |
![]() |
| A picture from the Spanish Steps in Rome with the Rome cut from Destinations. |
I love the way the cuts from Destinations cart look on the different pages. I wouldn't recommend cutting the Destinations cuts any smaller than 2 inches. They can get a little tricky and tough on my poor E.
I love this mat and a half with the train. The picture underneath is from Ghent and the paper clips spell out Ghent. It actually opens up for another set of pictures. I tried to add as many hidden little areas as possible.
What do you think of the Moab charm? I haven't found the pictures for that page, yet.
Remember that card you saw earlier that had been inked but didn't have paper yet? Here is another version of that car, this one had the parts cut out of it so you can see the pictures below. The one above shows the car in the pocket. The one below has been pulled out of the pocket.
Here are a few pictures of the book before I did any stamping and without the tags, mats or pictures.
These are a number of the tags that have been stamped on the back. I don't have a lot of stamps and I don't always feel comfortable stamping things. I purchased a few more travel related stamps and used them liberally through out this project. Luckily I had some of the Forest Moss Distress Inks for the green tags. I think they looked pretty good. I used Walnut Stain and Antique Linen for the brown shades.
I hope you have enjoyed my project and been inspired to create your own mini album. This one was a ton of fun, even if it was a lot of work.
Subscribe to:
Posts (Atom)


