It is quite a week. I haven't taken part in any of my favorite challenges (and I had a great idea for a rosette and a button for Bah! Humbug! Challenges but the first try didn't work perfectly and I just didn't have time to give it a second try). Here is one of the many reasons I've been so busy.
I made mailboxes for the Wonderkid's class. Whenever I mentioned I was making these mailboxes, friends and family said, "When I was a kid we used a paper bag and some glitter for our valentines." I completely forgot about those paper bags. Hey, the Wonderkid is only going to let me do this for a couple of years and then he will want those horrible store bought valentines and "what all the other kids have." Until then...
This cut is from SVGCuts Valentines Mailboxes Kit. It comes with three different styles. One looks like the big American mail boxes that you see outside the post office or pre - 9/11 you would see on street corners. However, mine have a bit of a twist. They are done with a Dr. Suess theme (or as the Wonderkid refers to him, Dr. Sue). The Wonderkid's class has been studying Dr. Suess and my little one thinks he is pretty cool. We read The Cat In the Hat or One Fish Two Fish almost every night.
I was getting tired of hearts and pink and really didn't want to make gender specific mailboxes so...
This is a picture of the tops of the mailboxes.
I made the bottoms yellow, the ends red, the top is white with printed pictures of Dr. Suess book covers and then I used a blue ribbon to make everything look nice and clean around the sides.
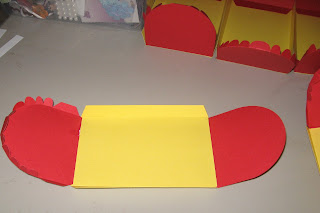
Here is a picture of the first step. As you can see, the front is a very clean rounded flap but the back has almost a scalloped look. Using SCAL2 they are easy to score with just your fingers. It is interesting, I don't like the score marks on most of the Cricut brand cuts but the ones from SVGCuts work a lot better. I'm not certain if it is where they place them or what but I delete the ones from cricut cuts and keep the ones from SVGCuts. Here is a close-up of the bottom, front and back.
This is a pile of the mailboxes without the outer layer, no magnet to keep it closed and before any of the details have been put in place.
One of my modifications to the file, instead of putting a ribbon around the middle so I could tie the front flap up, I put a 2 inch by .75 inch piece of paper under the outer cover. On the back side of that flap is a magnet. Then, under the front flap I put a small washer. The magnet is just strong enough to keep the front flap up but not so strong that it will rip the flap.
Here is the front, see how the flap stays up. I used the text in a path feature in SCAL2 to type Happy Valentines. I used Dr. Suess font. I messed with the placement until I got it exactly where I wanted it. I also used Dr. Suess font for each child's name. I colored all of the letters by hand. I know technically I could have used the cut and print function but I didn't have time to work out the details of changing the color and so on.
I think these little heart brads looked perfect with the colors of the book covers. I meant to put a heart on the flag but I didn't get it done before I delivered them this morning.
Here is one more view of the side.
Finally, the front of a couple of the boxes. I think they look fun all in a row with the names on them.
I hope this has given you some unique ways to use color and themes.
Thank you for looking. Tomorrow I'll have some information on the take-out box I'm making with the children in the Wonderkid's class. We'll see how well this craft project goes. I may be in over my head.


5 comments:
I think your mailboxes are adorable, and great for girls and boys, very nice job, I am sure the kids will just love them, thank you for shairng your project.
jmam4@comcast.net
What a lot of work, but a beautiful result! I love how they turned out
Wow, you've been busy! These look awesome! I'm sure they'll be a BIG hit with the kids. I really love how you used Dr. Seuss, very creative!
How fun! I suppose you made your own DP as well? I have just finished making Dr "Sue" invites for my grandsons first birthday. I hope to post them soon! Very fun!!!
Very cute idea! Love it. I already made the treats for my grandsons but if I had seen these first....................
Anyway, I've joined your blog. Come and visit me too!
http://mimi2trentdrew.blogspot.com/
Post a Comment